By Vincent Hoesch and Werner Fritz · Fritz Segel – The Dragon Tuning Manual (2012, v04)
↓ Readable PDF↓ Original pages (scan)
Fritz Segel’s comprehensive Dragon manual, written for its sails but covering the whole rig and boat. A short guide gives Loos PT-2M settings by Beaufort range (uppers from 9–11 LU in light air to 17–27 LU in strong wind, lowers slack until about 3 Bft), shroud positions of 790–810 mm (uppers) and 820–840 mm (lowers) behind station 4, a fixed rake of 1215 mm and maximum runner tension of 16 LU. The detailed chapters explain how to set the zero mast position and mast butt (aiming for 30–40 mm forward bend at 16 LU on the runners), jumpers, mainsail and genoa controls, runner marks and spinnaker trim, followed by a step-by-step rigging procedure, sail selection and care, and a racing-diary tuning sheet.
Dragon Experiences — by Vincent Hoesch and Werner Fritz, fine tuned and summarized by Vincent Hoesch.
1 Introduction
“Sailing fast, even being the fastest” — isn’t that what everybody wants? Our tuning instructions for your Fritz Dragon sails are made to help you achieve this goal.
Our sail combinations have won many world championships, European championships and regattas on most inland lakes.
Why? Simply because of perfectly designed sails combined with a rig that is tuned to the sails and not vice versa.
For this purpose three essential methods of tuning shall be applied:
- The Runners: They must be easy to use and run smoothly, so that the maximum tension of 16 LU (= units on LOOS PT 2M Gauge) on the runner wire can be easily applied.
- The Mast Lever (ram): With this tool you can pre-bend the mast forward or straight while sailing upwind.
- The Shrouds: During sailing adjustment of the shrouds is allowed. Therefore, it is very important to know how much tension is applied on the shrouds when leaving the dock and how much the tension will change when the related turnbuckles are operated.
Of course, the outhaul, the genoa halyard tension, the main- and genoa sheet, and all the other means of tuning have to be handled easily and without any problems, but the most important detail is the mast’s trim. Therefore, our tuning guide is the basis for the perfect tuning. However open questions will still exist. You should take the opportunity to contact Werner Fritz or Vincent Hoesch during regattas. Both are prepared to help.
For those who can’t wait to try it out for themselves, Vincent Hoesch offers tuning and regatta trainings on his web site, www.vincent-hoesch.de.
Your Fritz Dragon Team
Werner Fritz
FRITZ Segel GmbH; Ernsdorferstraße 66
83209 Prien am Chiemsee
Tel: +49 (0)8051-4327; Mo–Fr 9–12 and 13–17 hours
Fax: +49 (0)8051-62202
E-mail: info@fritz-segel.com
2 The Short Tuning Guide
2.1 Tuning the Rig
Before you start: for all measurements on shrouds, runners and forestay the use of the “LOOS GAUGE PT-2M” is mandatory, since all measurements given below refer to that device. The reference point for all measurement on shrouds and runners is approximately 1450 mm above the deck. All measurements on the upper shrouds have to be performed without the plastic shroud protection. If present remove locally the plastic coverage at the place of measurement.
Abbreviations:
- LU = are the measurements read from the LOOS GAUGE
- LW = light wind
- MW = medium wind
- HW = heavy winds
- FW = flat water
- CW = choppy water
| Upper shrouds (US) | LW | 0 – 1.0 Bft | 9 – 10 LU (wave) | 11 LU flat water |
| MW (I) | 1.5 – 2.5 Bft | 11 – 13 LU (wave) | 12 – 14 LU flat water | |
| MW (II) | 3.0 – 4.0 Bft | 14 – 16 LU (wave) | 13 – 18 LU flat water | |
| SW | 4.5 – 8.0 Bft | 17 – 26 LU (wave) | 19 – 27 LU flat water | |
| Lower Shrouds (LS) | LW | 0 – 1.0 Bft | no tension (wave) | no tension, flat water |
| MW (I) | 1.5 – 2.5 Bft | no tension (wave) | no tension, flat water | |
| MW (II) | 3.0 – 4.0 Bft | 5 – 6 LU (wave) | 5 – 7 LU flat water | |
| SW | 4.5 – 8.0 Bft | 7 – 11 LU (wave) | 8 – 12 LU flat water | |
| Tension on both runners set to 6 LU | ||||
Attention: Masts of different brands sometimes need different tensions on the lowers. The measurements above are rough figures only. Masts of the same manufacturer could show different lateral bending.
Always check lateral bending of the mast while sailing upwind. Look along the sail track up to the mast’s top and check, if the mast is straight or is bending to leeward or to windward at the spreader.
| All measurements are taken from station #4 towards astern up to the middle of the upper and lower shrouds. | ||||||
|---|---|---|---|---|---|---|
| Shroud positions | Petticrows | US | 790 – 800 | behind station #4 | LS 820 – 830 | behind station #4 |
| Börresen | US | 790 – 810 | LS 820 – 840 | |||
| Glas | US | 790 – 800 | LS 820 – 830 | |||
| Mast rake | For all boats: 1215 mm, according to procedure described on para 3.4.2 | ||
| Mast butt position | no fixed position can be defined, since the dedicated tracks is fixed in different positions (sometimes the difference exceeds not 5 mm) | ||
| Jumpers | It is hard to measure any reliable numbers, except for the fixed jumpers. | ||
| LW | 0 – 1 Bft | jumpers slack (more twist in the main sail possible) | |
| 1 – 2 Bft | A little bit more tight, use lever for lateral adjustment of jumpers to straighten your masthead in order to build up power in main sail. | ||
| MW | 2 – 4.5 Bft |
|
|
| HW | 5 Bft and more |
|
|
| Back Stay | Up to 1 Bft the back stay is used for pre-bend and trim of the mast. In a breeze, the backstay is used for safety on the reach and down-wind courses | ||
| Mast Control | Upwind | 0 – 1 Bft | Push mast control 10 – 15 mm forward Put on the back stay |
| 1.5 – 4 Bft | Pull mast control back at maximum (minimum pre-bend on mast) | ||
| 4 Bft and more | Push mast control 10 – 15 mm forward | ||
| Downwind | Push mast control 50 mm forward (to maximum) | ||
| Reach | Push mast in neutral position. Make sure mast can’t bend backwards | ||
2.2 Tuning the Mainsail
| Main sheet, upwind | The top batten should be parallel to the main boom. Put several reference marks on the main sheet in order to compare with other boats while tuning, until you have a “good feeling” about where the correct position of the mainsheet is. Change your trim (tension of main sheet) according to wind conditions and your way of steering. | ||
| Outhaul | The outhaul will be adjusted in a small range of 20 – 40 mm. During constant wind conditions the outhaul is initially set and will be rarely adjusted. Make sure that the outhaul is easy to handle, so that you can adjust it at any time if necessary with a minimum amount of force. A ratio of 1:12 is recommended. Since the length of the sail’s foot is different with the manufacturers take reference for its adequate tension on the fold which appears parallel to the boom. |
||
| Upwind | 0 – 1 Bft | Even at wave condition the fold parallel to the boom may just show up. | |
| 1.5 – 3.5 Bft | At flat water condition the fold shall show up clearly At coarse water ease the outhaul a bit |
||
| 4 Bft and more | Put maximum tension on outhaul (until mark) | ||
| Reach and downwind | Ease the outhaul about 80 – 100 mm to provide maximum camber of the sail | ||
| Boom Vang |
|
||
2.3 Tuning the Genoa
Genoa shape
In most weather conditions, the leech should be tuned:
- In LW 60–80 mm off the spreader tips.
- In MW tune it closer to 30–60 mm.
- In HW, tune it to 80–120 mm off the spreader tips when the genoa sheet has been tuned to an upwind position. This means the foot of the genoa is touching the upper shrouds (by adjusting barber hauler and sheet) and the luff has been set properly (halyard).
- In MW conditions and flat water, you can tune it even closer to the spreader (30 mm), but only as far as it will go without any signs of backwind in the main sail.
2.3.1 Genoa Barber
Genoa barber shall be tuned after the genoa sheet has been set at:
- LW: The genoa outhaul is just touching the upper shrouds at a level 30 mm above the deck
- MW: The genoa outhaul is touching the upper shrouds at a level of 70 – 250 mm
- HW: The genoa outhaul is touching the upper shrouds at a level of 250 – 450 mm.
Important: Tune the genoa leech with the barber that the leech distance to the spreader is as described in chapter “genoa shape”. Look from astern from leeward towards the genoa leech.
2.3.2 Genoa Lead
The position of the genoa lead in and out shall be measured at the intersection of deck and hull.
For LW, MW and HW: select the most inner position of the lead. This corresponds to a distance of 360 mm approx. from the intersection of deck and hull towards the boat’s centerline.
The genoa’s lead is moved outside only when sailing on a reach.
2.3.3 Genoa Halyard
Tune the halyard in all wind conditions as follows:
Set the halyard’s tension such: to remove just the cross wrinkles at the luff. In light or middle air, small wrinkles in the luff may appear. Too much tension on the luff makes the sail slow and will damage your sail.
2.4 Runners
2.4.1 Upwind
Setting for Heavy Wind
- Set mast rake to 1215 mm
- Set port runner to 16 LU (LOOS gauge)
- Set starboard runner to 16 LU (LOOS gauge)
- Mark both runners just at the deck’s outlet by a tape (TESA) wound around the wire. This represents the reference for maximum tension on the runners when sailing at HW
- Check again the runners tension (should remain at 16 LU)
- Measure the tension on fore stay. The tension shall read 33 – 35 LU
For the various wind speeds adjust the runners tension according to the maximum tension reference mark as follows:
| 0 – 1 Bft | loose – 200 mm |
| 1 – 2 Bft | 160 – 130 mm |
| 2 – 3 Bft | 130 – 100 mm |
| 3 – 4 Bft | 90 – 50 mm |
| 4 – 5 Bft | 40 – 30 mm |
| 5 – 6 Bft | 20 – 0 mm |
2.4.2 Beam Reach
When sailing on reach set the mark on the runners above deck as follows:
- LW 310 mm
- MW 280 mm – 200 mm
- HW 180 mm – 100 mm
- Push the mast forward by 20 – 40 mm
2.4.3 Downwind
When sailing downwind, ease runners by 680 mm and have the ram pushed all the way (50 mm) forward. Above the deck outlet allow the mast only a slight bending forward. Mark this position on the coarse adjustment of the runners (680 mm above deck) with fine adjustment fully eased.
3 Detailed Dragon Tuning Guide
3.1 General
Before rigging the boat you should have done following tasks.
Put the mast on two stands and check by looking up from butt to top to see if the mast is straight. If not, carefully try to make it straight. If you need help contact Vincent Hoesch or Michael Lipp.
- Adjustment of the upper shroud at the spreader tip
The new Petticrows masts allow you to fix the upper shrouds at their feed through on the spreader. This eliminates the “hanging down” of the spreaders.
Procedure:- Remove the fitting at the spreader tip
- Fix the shroud’s upper section with nut (8 mm wrench) such that the spreader is not “hanging down” and the upper shroud is under tension between the mast’s top and the spreader. Adjust the tension such that you need power to fit the spreader fitting/upper shroud assembly from outside into the spreader body
- Check by measurement the distance between the upper shroud’s attachment to the mast and the spreader’s tip for symmetry on both sides. If this work has been performed accurately no further adjustment will be necessary in future
- Protection of the spreaders by tape
- Apply white tape at the spreader’s tip to prevent the genoa from stripes caused by chafing or more serious cracks will appear on the sail. This also for the main sail when fully eased.
- Also take the opportunity to carefully cover all cotter pins and bolts with tape.
- Adjustment of the jumpers
- If you have jumpers not adjustable from the cockpit set them to a tension of 9 – 11 LU. We recommend put the jumpers in fixed position only if the angle of the jump stay is set as open it complies to the Dragon specification
Specification: The chord from tip to tip shall measure a minimum of 30 mm
- However this specification will be met on a few newer masts built after 2008 only. If you have fixed jumpers or you intend to use fixed jumpers in future you may change the dedicated angle. In this case contact Vincent Hoesch or Michael Lipp.
- Double check if the mast upper section is straight. Once the boat has been rigged, you can change the jumpers only using a ladder, which is a dangerous operation. Adjustable jumpers are much simpler because they can be tuned inside the boat.
- Shock cord as a safety precaution on the lower shrouds
If you sail with the spinnaker boom on the main boom, a piece of shock cord (diameter 3 mm) shall be placed between the lower shrouds on level 100 mm below their outlet from the mast. This prevents the spinnaker pole lift getting stuck between the mast and the lower shrouds. - Checking bolts and screws on the mast
- Frequently check all screws, rings, pins, bolts or rivets on the mast
- Vibration during e.g. transportation and sailing may cause them loose. Remove them and insert them after adhesive application.
- Clean all shrouds, halyards and stays using water and soap or ACETON. This prevents ugly black stripes on the sails and genoa luff. Cleaning the mast is also useful to detect loose screws, rivets and hook traps.
- Suspension of runners
A glance at the suspension of the runners on the mast may prevent you of a lot of trouble.- Special attention is required to the system where the wire of the runners is fixed onto the mast, since the runners tend to break just at the hole of the mast. Frequently check this area and when in doubt, exchange the items.
- If an exchange is necessary it is recommended to switch over to a safe system. A broken mast caused by a runner’s failure may lead to worse scoring.
- Check for damage on main halyard and jib halyard
- Frequently check your main halyard and genoa halyard regularly for damage at the ball. This is strongly required at windy conditions.
- We recommend to use bee wax for the halyards for protection. Advantage: The halyards will run more smoothly and don’t wear out as quickly. You will also detect any damage.
- Fixing the wind direction indicator and telltales
- Don’t forget to install your wind direction indicator.
- We would recommend using “HAWK” for dinghies, since it is light and easy to install and not twistable.
- Install on each upper and lower shroud a telltale (made of cassette tape) on a level 2.0 – 2.2 meter above deck. On downwind it is very helpful to both helmsmen and crew.
Summary: Those who frequently do a quick check before rigging the boat can exclude a lot of trouble and fiddling while sailing!
3.2 Tuning the Rig
3.2.1 Influence and interaction of tension between Upper Shroud, Lower Shroud, tension of forestay, runners and ram in upwind conditions
In order to understand the tuning of a boat and the application, one has to get familiar with the function of the different meanings of tuning and the effect of tuning procedures in different wind and water conditions.
The tuning objective in light winds below 0.5 – 1 Bft is to depower by opening the leech of the mainsail
Weight distribution of the crew
- 0.5 Bft — Both, crew and should sit on the leeward rail.
- 0.5 Bft and more — The helmsman shall move onto the bench.
- 1.0 Bft and more — The helmsman shall move if possible to the windward edge of the Hull.
At low wind and wave conditions the Crew move to windward only if the wind increases rather than at flat water. A certain amount of heel is required.
Tuning objective at
- Light wind (0 – 1.0 Bft) and flat water is to produce a pre-bend on the mast, that opens the main sail in the upper section and in addition makes the entire sail more flat. A light breeze (0 – 1.0 Bft) enables the flow to stay longer and support the flow.
- Light wind and wave requires a bit less pre-bend on the mast to obtain more camber on the sail which result in more power by the main sail.
- Light wind requires less tension on the fore stay which makes the steering easier. The dedicated sag of the fore stay will be produced by
- pulling the ram 10 – 15 mm forward off the zero position
- little tension on the backstay
- the runners and the adjustable jumpers shall be set loose up to 0.5 Bft. Above 0.5 Bft apply slightly tension on the back stay.
- at Low wind up to 0.5 Bft the entire crew weight shall move to leeward to obtain the required heel.
- Above 1.0 Bft the heel shall reach 7 – 10° approximately. However the helmsman should, if possible, control the helm while sitting windward.
- Jumpers shall be applied earliest above 1.0 Bft and, if necessary, to trim the mast straight in its upper section.
Important: The lower the wind the fuller and faster you should steer. Do not concentrate on pointing
3.2.2 Tuning objective in MW I from 1.5 – 2.5 Bft is the controlled pressure building
Distribution of crew weight
- The helmsman position shall be on the windward edge. The crew is on the leeward side or in the middle of the boat.
- Above 1.5 Bft approx. the middle person should move to windward in the cockpit.
- Above 2.0 Bft the middle person shall move to the windward edge.
- At 2.5 Bft and more, the entire crew shall move to the windward edge. The last person that moves to the windward edge is the person who controls the genoa sheet.
Attention: at choppy waters the boat requires more heel. As a consequence the crew shall move to the windward edge if the wind speed will exceed 3.0 Bft.
The tuning objective in MW I from 1.5 – 2.5 Bft is to allow in the area of the spreader attachment of the mast a slight sag (better is no sag!) in leeward direction as well as to exclude almost any mast bend in forward direction.
The result is more camber in the main sail which can be controlled at the leech, which leads to increased pointing and speed capability. The top batten shall be roughly parallel to the main boom!
Above 2.5 Bft the genoa’s sag in its luff is reduced by increasing the tension on the runners and pulling back the ram in order to sail higher.
The masthead above the jump stay should, in no condition, bend toward the leeward side. Therefore, tune the jumpers sideways to windward. If the jumpers are adjustable on both sides, one should tune the mast in such a way that it is straight above the jump stay. This will lead to a higher pointing ability and speed.
Attention: Don’t use too much tension on the runners in a chop.
Remember: The flatter the genoa entry is, the better the pointing ability, but only if one is sailing straight and pointing. (The telltales are touching the genoa on the windward and the leeward sides). It is only better to heel more in CW.
3.2.3 The tuning objective in MW II from 2.5 – 4 Bft is to produce maximum pressure in the sails
Distribution of the crew weight: Helmsman and crew should hang windward and try to sail the boat upright.
The tuning objective in MW II from 2.5 – 4 Bft is to keep the mast straight by increasing the tension in the upper shrouds. The lower shrouds (LS) should be tuned, that the mast is straight at the level of the spreader, when looking into the sail track from behind the mast.
A flat entry of the genoa can only be reached by a high tension in the runners, which bends the mast forward (positive bend) at the same time.
- The ram will therefore be kept at zero (pulled back totally).
- The genoa and main sheet are trimmed increasingly tighter in conditions of more than 2.5 Bft. But above 3.0 – 3.5 Bft you have to allow, depending on the crew weight, the mainsail leech to open in order to keep the optimal heeling of 7–10 degrees. The more wind you have, the more you have to point the boat
- The telltales on the genoa must be parallel to the leeward ones from 1 – 4.5 Bft. From 5 Bft onward they can move up 30 – 40 degrees in order to sail the boat flat.
- At 4 – 4.5 Bft the genoa is, depending on the weight of the crew, sailed with a backwind in the entry (at 150–450 mm from the luff).
3.2.4 The tuning objective in high winds of more than 4.5 Bft
The objective is
- to depower the sails according to the rules
- survival training at 7 – 8 Bft means that everybody hikes out as far as possible
The tuning objective in high winds is to achieve forward/positive mast bend. In order to get this, you need to push the ram 5–15 mm forward from zero and tune the runners as tightly as possible (16 LU!). At the level of the spreader, the mast should be straight sideways. Only when you have a light crew it may bend slightly leeward above the spreader, which you can achieve by increasing the tension in the lower shrouds. You can only reach the necessary forward bend in the mast and little sag at the fore stay when you pull the runners very tight. All these adjustments release the pressure on the heeling and allow you to sail the boat with minimum helm and with a high pointing ability.
- The jumpers are tuned only slightly in the middle adjustment and are geared toward the windward side in the head so that the mast is straight.
- The leeward jump stay is open.
- The boat is pointed until the windward indicators move up considerably. The heeling at HW shouldn’t exceed 10–12 degrees when sailing in HW
- Adjust the main traveler, depending on the weight of the crew,
- up to 5 Bft at center
- Above 5.5 Bft, 100 mm to leeward and pull hard on the main sheet.
Attention: Don’t pull the backstay, because a little too much tension will open up the head of the main sail, make it flat, and take away the momentum of the main sail in the head.
Sailing in HW of more than 6 Bft is a question of adaptation and enjoyment, since tuning, weight of the crew, physical condition, patience, courage and experience are important factors in successfully finishing a race in HW. If you have the right tuning, you will see how much fun sailing in HW can be!
3.3 Upper Shrouds
The goal is to have always a straight mast. You can check this by looking up from behind the sail track to confirm that there is no sideways bend in the mast.
At HW light crews will tune the mast at spreader level slightly to windward to reduce the pressure on the rig. The lowers are tuned rather tightly, but shall not exceed 50% of the tension of the uppers (e.g. upper shrouds on 28 LU and lower shrouds on 12 – 14 LU).
Remember: The sideways bending in the mast is affected by 4 factors:
- the opening of the deck which may not be too wide
- the upper shrouds
- the lower shrouds
- the jump stay.
- The upper shrouds control the sideways bending of the mast between the deck and the attachment point of the upper shrouds and to a small extent also the head and the jumpers when tuned.
- The lower shrouds influence the sideways bending of the mast between the deck and the spreader and up to the attachment point of the uppers.
- The jumpers only regulate the mast head above the attachment point of the uppers, but you shouldn’t forget that jumpers pulled very tight can influence the bending of the mast head significantly.
Pay attention when measuring the tension of the shrouds: The measuring point for the “Loos Gauge” for all measurements at shrouds, forestay and runners is about 1450 mm above the deck
LU means the units of measure with the “Loos Gauge”; when measuring the tension of the uppers do the following:
- Set both runners at 6 LU and have mast ram at zero.
- All measurements should be taken without the plastic protection on the shrouds. We usually cut the plastic protection on the uppers twice in order to being able to apply the Gauge down at the two Teflon wheels and up at the measure groove.
| Numbers for upper shrouds | |||
|---|---|---|---|
| LW | 0 – 1 Bft | 9 – 10 LU choppy water | 11 LU flat water |
| MW I | 1.5 – 2.5 Bft | 11 – 13 LU choppy water | 12 – 14 LU flat water |
| MW II | 3.0 – 4 Bft | 14 – 16 LU choppy water | 13 – 18 LU flat water |
| HW | 4 – 8 Bft | 17 – 26 LU choppy water | 19 – 27 LU flat water |
To reduce power in high winds, pull the runners tight, push the ram forward, keep the main traveler centered, increase the tension on the LS, and reduce the tension in the jumpers.
Attention: The jumpers must be loose. Check to see if the masthead is straight or if one of the jumper adjustments pulled it to the side by looking into the groove. Should your mast head, despite several attempts, bend toward one side because it is slightly bent, tune the jumpers as long as the mast, looking at the sail track, seems to be straight.
After tuning the mast, jumpers and shrouds according to the units above, take a steel tape measure, pull it up with the main halyard and let the ball click into the lock. Now measure the distance on both sides at a reference point selected (e.g. the connection between the hull and the deck) to see if the masthead is in the middle of the boat.
Don’t forget to pull the tape measure straight (for this reason steel ones are best), and watch out for the wind coming from the side. If you get different results on each side, you have to change the shrouds until the masthead is straight. This procedure can take some time. When you have satisfying results, write down the measurements in your tuning book.
3.4 Lower Shrouds (“LS”)
The LS control the sideways bending of the mast between the deck and the spreader and the region of the intersection of the US. Very loose LS let the mast bend leeward at the spreader, narrow the slot between genoa and main, increase the pressure, and make the main get fuller in the lower and middle section.
Our measurements for the LS are only reference points. The best way to tune the LS is to look from the gooseneck up to the top along the sail track while sailing upwind.
Rule: In winds from 2 – 3.5 Bft the mast may bend – but better not – to the leeward below the spreader. In winds over 4 Bft the mast has to be straight sideways in the area between deck and spreader. Above the spreader light crews may tune the mast a bit to leeward, this means at spreader level the mast may bend a bit to windward.
Pay attention to the tension of the LS:
Masts of different producers may be tuned with different measurements.
The figures below belong to a new mast manufactured by “Petticrow”. All other masts need less tension for the LS. Therefore always check the mast when sailing upwind by looking at the groove of the mast from behind to see if it is straight, bent leeward, or bent windward at the spreader. The objective is to nearly always have a straight mast when looking at the groove from behind.
Below are our measurements, which are based on our experience for your basic tuning:
| Lower shrouds | |||
|---|---|---|---|
| LW | 0 – 1.0 Bft | Loose in choppy water | Loose in flat water |
| MW I | 1.5 – 2.5 Bft | Loose in choppy water | Loose in flat water |
| MW II | 3.0 – 4.0 Bft | 5 – 6 LU in choppy water | 5 – 7 in flat water |
| HW | 4.5 – 8.0 Bft | 7 – 11 in choppy water | 8 – 12 in flat water |
3.4.1 Position of shrouds through deck
The opening of the uppers and the lowers are the same for nearly all types of Dragon. This is the case for all boats that have similar positions of the mast step and measurements of the opening on the deck. Take all measurements relating to the US, LS and deck openings using station #4 as a reference point.
It might be best to draw a line with a pencil across the deck in order to take or check measurements. A few boats have already indicated a mark on the deck.
Measure the distance from station #4 to the US or the LS at the opening on the deck as follows:
| Petticrows | US 790 – 800 | LS 820 – 830 |
| Börresen | US 790 – 810 | LS 820 – 840 |
| Glas | US 790 – 800 | LS 820 – 830 |
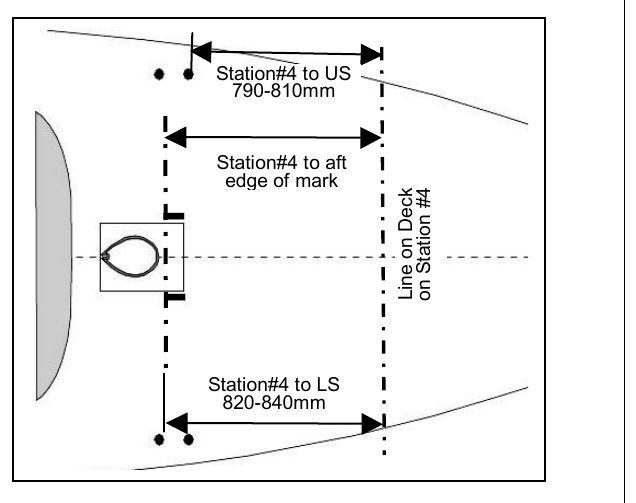
We generally recommend these shroud positions for all sailing areas.
The drawing above shows the distance from station #4 to the position of the US and the LS, as well as the distance between station #4 from the line across to the edge from astern of both measurement marks at the side of the mast.
Very important: If the front of the mast (excluding spinnaker boom track) is in line with the astern edge of both measurement marks on the mast (each 50 mm long), which is the zero position (see drawing on para 3.4.3), the LS will be in line with the front of the mast, and the US will be 30 mm farther forward. Make sure that the mast can only be moved sideways a maximum of 1 mm maximum at the deck opening.
3.4.2 Length of the Forestay (Mast Rake)
This measurement must be performed very carefully since all other measurements (e.g. tension of runners, ram control position of mast step) depend on it.
- Put the ram in zero position
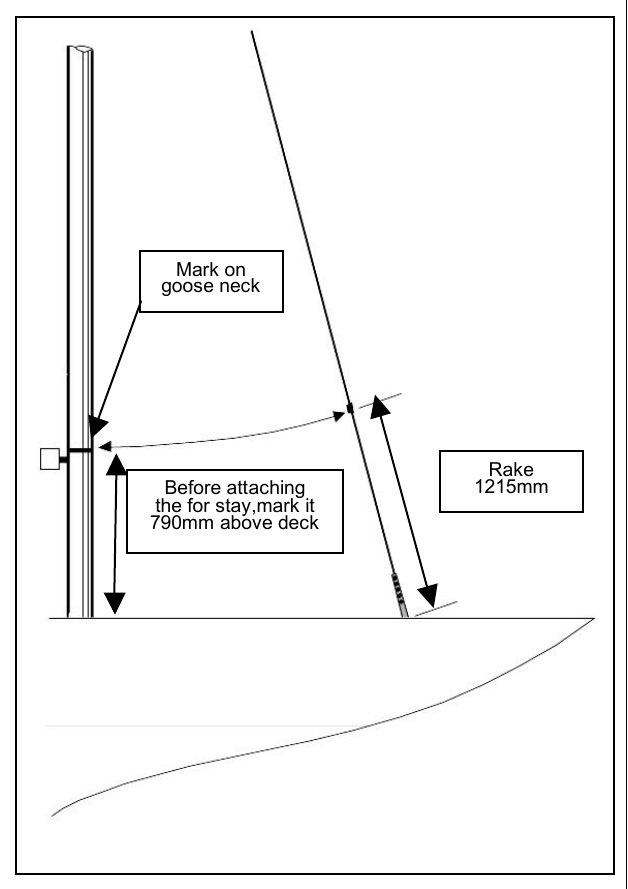
- Hold a measuring tape against aside the mast and mark a point at 790 mm above the deck.
Attention: don’t measure from any plates or the mast flange, from the deck - Check the result against the drawing on right. The dimension 790 mm gained shall be within the area of the mark near the goose neck
- Before attaching the forestay, hold it next aside to the mast and mark the head stay where it intersects the 790 mm mark. Do this very carefully, because the whole tuning of the boat depends on this mark.
- Mark the forestay with a felt tip pen, so that the lower edge of the mark you paint at the forestay is at the same height as the upper edge of the 790 mm mark. Renew this mark from time to time, because it will make finding it again easier.
- Now attach the forestay into the metal fitting.
- Set the tension of the runners such that 25 LU are measured on the fore stay
- Now take the measurement with a measuring tape parallel to the fore stay from the upper edge of the deck to the reference point which you have just marked on the forestay.
- Repeat this measurement until it reaches the measurement of 1215 mm. Check the tension on the fore stay 25 LU. Once tuned, we generally don’t tune the rake ever again.
- You need to repeat this procedure because of stretching of the wires and terminals if you have a new boat or a new rig. According to our experience a permanent deflection of 10 – 15 mm minimum may be observed
3.4.3 Mast Butt Position
Finding out the right mast butt position is not very easy, since the mast boot varies from boat to boat, sometimes, even in boats of the same manufacturer. Since there is no way to take measurements from a reference point (e.g. from the stern to the back edge of the mast butt), the only thing you can do is to follow our instructions on how to find the right mast butt position.
This method is a bit time consuming, but once you have found the right position of the mast butt, you will never have any problems with your boat again.
Take your time, because as with all important adjustments on your boat, you have to follow the instructions step by step and double check all measurements.
- Put a line up between the measurement marks on station #4 put on the side of the hull by the manufacturer.
- Check the right position of both marks (50 mm long) next to the deck opening of the mast

Zero position of the mast (from here the mast front face may be pushed 50 mm forward); station #4 to mark 820–840 mm; max. 1860 mm between marks according to the rules. - The distance between the back edge of the 50 mm measurement point and the mark on station #4 measured on the center line on the deck should be between 820 – 840 mm (optimum is 830 mm).
- Measure the distance from the mark at the side of station #4 to the opening of the uppers on the deck (790–800 mm would be good (see also drawing on para. 3.4.1))
- Check the 70 mm long mark at the opening of the forestay, to see if it is set properly.
Attention: It is not a tuning measurement, but a real measurement.
The allowed distance between the aft edge of the 50 mm marks aside the deck opening and the forward edge of the 70 mm long measurement marks aside the fore stay is 1860 maximum.
If necessary, you will have to change the marks on the deck.
Example: The 50 mm mast mark has been set at 810 mm behind station #4. If you intend to move the mast mark 20 mm towards stern you also have to move back the mark of the forestay 20 mm accordingly. - If you have not rigged the boat yet, do it now and mark your forestay according to the method of taking the rake measurement (para. 3.4.3). Attach your forestay at a rake of 1215 mm.
- Tune your upper shrouds and lower shrouds to MWI tension (US=18 LU, LS=10 LU). Don’t pull them any tighter, since you have to loosen them again sometimes when the mast butt has to be moved forwards or backwards.
- When you pull the mast with the ram back towards zero (see drawing above), the front of the mast, excluding the spinnaker boom track, should be in line with the back edge of the 50 mm marks on both sides on the mast (see drawing).
In order to check this, put a ruler or batten across in front of the mast to see when the front edge of the mast is in line with the back edge of both marks.
Don’t forget to deduct the spinnaker boom track!
If the front edge of the mast is in front of the back edge of these marks, you must tune the ram or the turnbuckle of the shrouds between the lever and the mast in such a way that the mast can be pulled back in the deck to the line mentioned above.
Now you have reached the zero from which you can push the mast forward up to 50 mm when sailing downwind. - To find the right mast butt position set the runner until it is in its tightest position of 16 LU, which means, it is at the opening of the deck next to the runners tape mark.
Double-check the length of the forestay to make sure it’s at 1215 mm, because it might have to be corrected when under tension (see also paragraph 4, step 6).
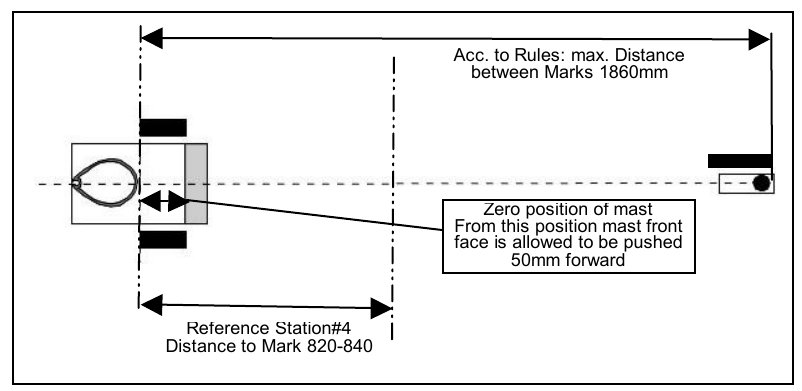
Remember: The maximum tension of the runners at a rake of 1215 mm is at 16 LU. This runner tightening procedure seems to be very rough at first, but if your Dragon can’t take it while at the dock without waves or wind pressure, something will certainly break while sailing.
You have tightened the runners to 16 LU at a mast rake of 1215 mm and kept the jumpers loose. Pull the main halyard and hold it at the groove of the mast at the height of the black measure mark at the goose neck. Now you can see, how much the mast is bending forward (= bending positive) by measuring the distance from the groove and the main halyard at the point of the greatest distance, which is approx. at the height of the spreader.
Find out, if the whole mast is bending forward with a positive bend, standing straight, or bending backward with a negative bend at 16 LU on the runners.
- When the runners are tight on 16 LU the mast must bend forward 30 mm, measured in the middle at the height of the spreaders. Under no circumstances should it bend backwards.
- If the whole mast is bending forward more than 40 mm, the mast butt must be pushed forward one hole in the mast track. Loosen the shrouds then put the mast butt forward one hole, which might be too much.
Then check if you have to put the mast forward another hole, so that it is bending forward between 30 – 40 mm (runners to 16 LU at a mast rake of 1215 mm).
(Remember: all measurements have to be carried out with the
- maximum tension of 16 LU in the runners,
- US set on MW
- ram at zero)
If the mast is bending backwards the mast butt has to be pushed back toward astern until a bend of 30 – 40 mm is reached. This dimension is valid for all mast types with Fritz sails.
For “Petticrow” Dragons we have evaluated following figures:
- “Petticrow GRP” Dragon
- The bolt situated on the mast butt and bolted to the mast step shall be fitted into the 9th hole.
- For verification the distance between bulkhead and
- front face of the mast butt measures 195 mm
- mast center line measures 245 mm
- “Petticrow Cold Moulded” Dragon
- the distance between bulkhead and front face of the mast butt measures 145 mm
These numbers need to be checked. No warranty to these figures!
3.4.4 Jumpers
Introduction: The jumpers control the sideways and backward bending of the mast at the point above the uppers and the forestay attachment point. Jumpers control the masthead’s bending in the upper region and control simultaneously the sideways leeward or windward bend. For many dragons, the jumpers can be adjusted sideways separately, which prevents the mast head from leaning too much leeward in order to give the upper part of the main sail a deep, symmetrical profile.
Minor experienced crews may be not encouraged to tune the jumpers: The advantage of the fixed jumpers is that they are tuned only once before rigging the boat and cannot be changed again. Adjustable jumpers need the installation of three clamps, levers, ropes and many ratios more in the boat which needs much more attention to the individual tuning tools.
Adjustment however, only works if the jumper diamond complies with the class rules and has a very open angle (approx. 150).
The further the stay points are forward (this is the case with all older masts), the more the mast head bends forward by tightened fixed jumpers. It is clear that it closes the main in the head in LW. If you want to sail with fixed jumpers, you must enlarge the angle of the jump stay as much as it complies to the Dragon’s class rules.
It is just simple:
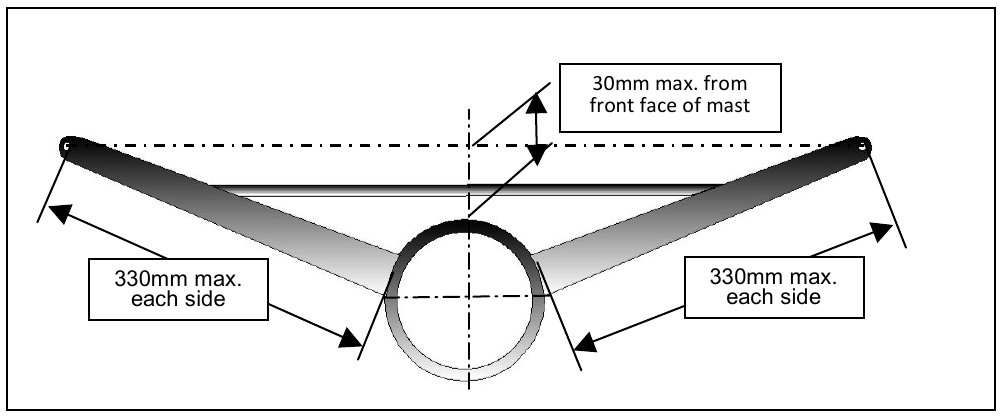
- Measure the length of each jumper bracket. The length measured from the mast must not exceed 330 mm (see drawing on next page)
- Pull the chord in front of the mast as far out as possible between the ends of both stays. The distance between the mast and the chord has to be a minimum of 30 mm. This is the maximum opening of the jumper brackets allowed by the rules.
Should you reach more than 40 mm between chord and mast front and you want to sail with fixed jumpers, you must change the opening of the brackets.
When you have this measure – 30 mm on the chord between the stays – you can sail with fixed jumpers and tune them to 9 – 11 LU. You will see that the mast either won’t bend forward (negative), or will bend only a very little in the top. At LW the desired bend can be reached by tuning the back stay.
If you have a distance between mast and chord of 40 mm or more, the jumpers should be adjustable.
To make things clear: with sideways adjustable jumpers you can make huge mistakes. One tends to forget to pull the windward jumper tight and to loosen it on the leeward side. This is bad for your pointing ability. We generally sail with the jumper central adjustment medium hard pulled and control the leeward bending of the mast head with the windward adjustment. This is only the case at 1 Bft wind speed and higher. Below that wind speed the jumpers are loose.
3.4.5 Jumper Tuning
- In LW below 1 Bft, the tuning objective is to tune the main sail flat in the region of the luff and to open the leech in order to create a current flowing above the surface of the sail.
- The main traveler has to be kept windward in order to keep as little tension in the main sheet as possible and to ease the leech of the main sail. Here we recommend the boom strut/boom lift, which lifts up the main boom in LW.
In very light wind- keep the jumpers in the central position and loose sideways,
- open the runners,
- push the ram 10–20 mm forward, and
- have the backstay pulled slightly.
At last, one understands that fixed jumpers with a big stays opening bend the mast head forward too much in the negative direction and will close the main sail in the head. Therefore, it is advisable to have the right tension for the fixed jumpers or have adjustable ones.
- In more than 1 Bft of wind speed, there is enough wind pressure to open the main in the leech. Now it would be good to tune the main sail fully and close the leech more in order to have more pressure in the sail.
- The jumpers should be pulled tighter in the central position above 1.5 Bft, and the mast head should be tuned straight via the sideways adjustment of the jumpers.
- Always check the sideways bending of the mast, when sailing upwind by looking at the groove from behind the mast.
- The main traveler has to be kept windward in order to keep as little tension in the main sheet as possible and to ease the leech of the main sail. Here we recommend the boom strut/boom lift, which lifts up the main boom in LW.
- In 2 – 3.5 Bft, one sails with jumpers fixed in the center and additionally tunes the mast straight in the head, which can be checked by looking at the groove from behind.
- In more than 4 – 5 Bft, one sails with less tension in the central position of the jumpers. The mast is only tuned via the sideways adjustable jumpers. In more wind you must, depending on the weight of the crew, set the jumpers more loosely, but never totally open. It is important to mark the pulling line of the jumper adjustment in order to find the perfect tuning again quickly. This is valid for all adjustment possibilities on board.
On our boats the jumpers are arranged as follows:
The central adjustment is on a cleat at the front bar. The color of the line is either white or light yellow. On it there are three marks:
- Loose for LW,
- middle for wind conditions of 1.0 – 2.5 Bft
- hard for wind conditions 2.5 – 4.0 Bft
- for more than 4.5 Bft
The sideways adjustment on the traveler bar uses a white line marked as well. Two stops (balls) are arranged in front of two clamps (one on each side) to prevent an over tuning of the windward jumper.
3.4.6 Backstay
When sailing a beat, the backstay is not used for tuning the mast. However there is one exception: at LW below 3 kn, you have to put some tension on the backstay instead of the runners.
In all other wind conditions, the backstay is only used when jibing under the spinnaker to secure the mast because at that moment it is both difficult and unnecessary to use the runners. Gybing with open runners and the backstay pulled a little makes it much easier. It is important to increase the tension of the windward runners in HW at some point after the gybe.
Attention
When the mast is tuned at 3 – 4 Bft and the boat is going under the spinnaker going downwind tie a knot or a stopper (ball) in front of the cleat on the backstay control line. This prevents, since the runners are open and the ram is the most forward position, the mast bending forward when gybing in HW.
Experience shows a not fixed back stay will lead to damage of the mast or at least to its permanent deflection.
3.4.7 Tuning the Main Sail
3.4.7.1 Main Sheet
The main sheet is one of the most important means of tuning on board. Next to the runners and the main sheet traveler, it is another tuning possibility which is used going windward. The main sheet should always be tuned differently for changing wind and wave conditions, when the helmsman is not steering in the “groove”.
While tacking the main sheet shall be eased some centimeters. Otherwise the tuning of the main sheet is used to see if you can sail faster or point more.
Pull the main sheet as the mainsail “looks right” and the boat “feels right” for you. The picture of “looking right” comes from experience and “looking good/right” comes from what good sailors have told us. The “right feeling” also comes from our own experience and what answer the tiller gives us. If it tells us, that we have too much of a weather helm, then it is possible, that the main sheet is being kept too tight. Finding the right tuning requires some experience and trial.
Once you have found a fast tuning, mark the main sheet in different colors symbolizing the different wind or wave conditions. While unrigging the boat, think about threading out your main sheet in such a way that you can use the marks to tune your main sheet the next time.
If you tune the main sheet harder, you prevent the twist in the main sail and the sail gets flatter. You should focus on the twist at the leech of the main sail.
A main rule for Dragons is, as for most boats, to tune the top batten parallel to the main boom. The battens point less windward when looking upward from below. In very LW, the weight of the boom causes the top batten to be parallel to the main boom or even to hook to windward (therefore a “boom strut” is strongly recommended). In very HW, the top batten will automatically twist leeward, which takes the pressure off the main sail.
You need to keep experimenting with the position of the top batten. Different wind or wave conditions will always require slightly different tuning. Success is reached by constantly observing other boats with which you can compare your speed, and by always trying out a different tuning until you learn, which tuning of the main sheet is too tight and which is too slack.
One, better more marks in different colors on the main sheet as well as at a distance of 40 – 50 mm on the fine tuning are very helpful to be able to reproduce the successful tuning on the next beat or on another day. Don’t forget, however, that wind or wave conditions change often and so does the optimal tuning.
Therefore, we again recommend keeping a regatta logbook in which you can take notes after every race about wind, wave, area, weather, competitors, favorite sides of the courses, the beam reach and downwind sails, season, air and water temperature and your own speed. Also note how you have tuned the shrouds, the main and genoa sheet, the runners etc. It is very helpful when returning to a regatta site to know beforehand how a breeze will influence the boat or which hidden danger comes from the west wind from the land, and above all how one has tuned successfully the previous year.
At the end of this tuning guide you’ll find a tuning sheet which has helped us a lot over the past years. Feel free to copy it and take advantage of our experience!
Like all means of tuning on your boat, the main sheet should run without any friction and have a big enough ratio. A 1:4 tuning ratio is currently standard on most regatta Dragons.
The advantage of this ratio is a shorter sheet at the start and during other maneuvers around the marks. The disadvantage is the smaller ratio in HW. A more powerful ratio of 1:5 capable to be switched over to 1:4 is related to the stronger helmsmen among us.
The disadvantage of this system ratio of tuning the sheet is an enormous length of the sheet during maneuvers. Marking the main sheet, however, will be easy at these two ratios, since the sheet begins with a fixed part and can be marked at the cleat.
Nowadays a coarse tuning ratio of 1:4 in conjunction with a fine tuning of 1:4 is mainly used. If you use the fine tuning, you’ll have a ratio of 1:16 which makes the fine tuning of the main sheet easier in MW and HW. During maneuvers, e.g. at the leeward mark one only has to pull the 1:4 ratio, which leads to a shorter sheet.
You can mark this 1:16 system very easily by doing as follows: The coarse tuning on one side of the main sheet ends on a turning block with a cleat and is marked for the basic tuning with 1 to 2 marks. This coarse tuning is continued at the other end behind the traveler beam as fine tuning at a ratio of 1:4. Above this opening of the traveler bar, you can apply several marks on the sheet and record them in your logbook. Take a look at the main sail when your boat is sailing smoothly, and remember the tuning. Take down the notes of the numbers and marks right after the race. Comparing with other competitors can be a good opportunity to find out the perfect tuning for the day. Reproduction of the tuning is a fundamental task when sailing.
When sailing a beat in MW and relatively FW at an optimal steering (in the groove), you can often tune the main sheet a bit tighter. This flattens the sail slightly in the front and increases the pressure on the leech. If you leave the optimal steering or tack, you must open up the main sheet a few centimeters for a short time in order to speed up the boat again. This knowledge leads to the fact that you can trim the sails more tightly in FW than in CW.
Right before tacking or when the speed of the boat is very slow, you should open the main sheet a little. That’s also the case in gusts of wind, or when the crew failed to hike, or the boat heels too much where finally only easing the sheet can flatten the boat and make it faster again.
3.4.7.2 Outhaul
On the beat, the outhaul should be easily adjustable in all wind conditions. It should have a ratio of 1:12 or 1:16 with a tackle system. A cascading tackle system helps pulling and easing. The outhaul should be tuned with a 5–6 mm diameter line in the middle of the beam on which the main traveler is fixed right next to the cleat of the main sheet. Or as an alternative it is installed on both sides of the beam to be operated from both by the helmsman or the crew in the middle. The tack of the mainsail has to be fixed 50 mm behind the mast.
3.4.7.3 Upwind
The outhaul is pretty sensitive to any adjustment. One of the main mistakes is to use too much outhaul in a wide wind range. It’s no use trying to power up the mainsail in LW by opening the outhaul. The main sail should be tuned more flat in the area of the sail’s foot.
Just change the tension of the outhaul if the wind conditions, water or wave movement, or angle towards the wind change.
The basic rule is to pull the outhaul a bit tighter if you have too much pressure and the boat is getting a weather helm. Also take the wave conditions into consideration. If you sail in FW, you must see the fold at the outhaul of the main sail, which builds up parallel to the main boom. It is obvious the fold is smaller at LW than at MW and HW.
Over 3 – 3.5 Bft the outhaul is set tight to its maximum. If you are sailing in choppy water you need to ease the outhaul a bit, but only a bit.
But always remember that these are only nuances which have to be adjusted when on a beat. To be on the safe side, you should mark the average tuning with a felt tip pen at the line of the outhaul control for LW, for MW I and for a maximum tight outhaul at wind conditions of more than 3.5 Bft.
On the reach and downwind
When sailing downwind in LW or MW, the outhaul should be opened 60–80 mm off the mark. On the reach in HW, ease the outhaul only a little or not at all because you have too much pressure on the sail.
When sailing in LW and MW, ease the outhaul to make the sail fuller. You should ease the outhaul only until the sail has reached the maximum camber. If you overdo it, the main sail loses too much sail area. The maximum point of easing the outhaul is 80–100 mm off the mark toward goose neck.
3.4.7.4 Cunningham
Always have some horizontal folds in the sail up to 4 Bft in order to hold the point of the deepest camber in the middle; this means no tension on the control line. If the wind force increases, pull the cunningham only until the horizontal folds at the outhaul just about disappear. At LW in no circumstances pull the cunningham. In changing wind conditions over 3.5 Bft it is always better to sail with the cunningham too slack than too tight. In more than 4.5 Bft light crews should pull hard at the cunningham.
3.4.7.5 Main Sheet Traveler
The most frequently asked question, how to adjust the traveler upwind, is very difficult to answer. The height of the traveler car in relation to the coaming, the distance of the main sheet track to the main boom and the kind of ratio of the main sheet (e.g. at the fine adjustment) influence the measures for the traveler considerably and make it impossible to answer.
- In LW and MW, one should adjust the traveler as much to windward that an extension line of the main boom with the tuned main sheet towards astern would intersect the backstay (in other words the main boom would stand about centered of the boat).
- In extremely LW, you should sail the main traveler very much to windward, in order to get the main boom somehow centered of the boat by pulling the main sheet as little as possible and not closing the main leech too much.
- In MW, don’t sail with the traveler so far to windward, but pull the main sheet tighter in order to reach the tuning objective of keeping the top batten parallel to the main boom. Basically in LW and MW the traveler should be moved considerably to windward.
- Over 4 Bft and mainly in CW, the traveler is sailed depending on wave shapes moved to windward a little bit only. Mostly it is sailed centered to the boat.
- Only if an unexpected gust hits the boat the traveler is moved beyond the center line to leeward. It is more efficient to ease the main sheet than to move the traveler to leeward since the sail’s leech opens. A traveler moved to leeward tightens the main sheet which is in contradiction to that what is desired. Therefore a perfect tuning of the main sheet will keep maximum speed.
3.4.7.6 Boom Vang
- On the reach, the boom vang should generally be tuned so that the top batten is parallel to the main boom. Particularly in MW and HW, the boom vang should be pulled very tight in order to avoid too much twisting in the main leech. You will find out yourself in due course that you will need relatively high tension in the vang on the reach in MW, and even more in HW.
- Going downwind, the boom vang should be kept a bit looser and the top batten a bit more open than parallel to the main boom. The crew should always watch the main leech and the top batten to be sure that the boom vang is correctly tuned and the main leech is being adjusted to the changing wind conditions and the respective tuning objectives.
- If the wind suddenly increases, pull the vang a little. If it decreases, ease the vang again.
3.4.7.7 Ram and Zero Position
The ram is responsible for an optimal tuning of the mast under all conditions. Therefore, it is mandatory to install a ram system if your boat doesn’t have one. Especially in HW, on the reach and downwind the mast needs to be pushed forward at the deck up to 50 mm (more isn’t allowed by the class rules). This leads to better control of the mast and an enormous amount of additional security in HW, since you sail with the runners open.
Definition of “Zero Position”
What is the zero setting for the mast? Zero is reached when the front edge of the mast, excluding the spinnaker boom track, lines up with the rear edge of both 50 mm measuring marks, situated on the side next to the opening of the mast on the deck.
Zero Position is also the maximum astern position of the front of the mast in the opening of the deck permitted by the class rules.
Attention: You may apply these marks a bit further back if you prefer for tuning reasons, but in this case the front mark on the forestay must also be set back towards astern. The maximum distance according to the rules between the front edge of the mast and the opening of the forestay on the deck may not be more than 1860 mm.
We found the following measurements on the different types of boats as perfect numbers. All measurements refer to the distance from station #4 towards astern to the rear edge of both measuring marks next to the opening of the deck. See also the drawing on para. 4.4.1.
| Petticrows | 830–840 mm |
| Börresen | 820–840 mm |
| Glas | 820–840 mm |
You can feel the advantage of the ram when sailing upwind because this tuning tool allows you to bend (ease the ram) the mast forward lengthwise in the area from the deck up to the forestay attachment point or inverse make the mast straight (by pulling the ram towards astern).
In LW up to 1 Bft, the main leech should open (twist) and the sail should be kept flat. This is only possible through a forward bending of the mast. You can make the mast more flexible by bending it forward 5–15 mm off the zero at the deck. If you pull slightly on the leech with the jumpers loose, you can reach the desired forward bend of the mast.
The same applies in HW, in which the mast is being pushed forward in the deck from 5 to 15 mm, but with tight runners.
3.5 Tuning the Genoa
Pull the genoa sheet tight until the leech is 60 to 80 mm off the spreader tip in LW, 20 to 50 mm off the spreader tip in MW(I) and MW(II), or 80 to 120 mm off in HW. Make sure that the foot of the genoa is not too tight. See next paragraph.
The right tuning of the genoa foot in LW, MW and HW also depends on the respective wave conditions. Usually the genoa outhaul should touch the uppers in LW. (It should be tuned to touch in the foot the uppers at a maximum of 50 mm in LW, 100–200 mm in MW(I), 250–350 mm in MW(II), and 400–500 mm in HW).
There are seven areas of tuning which influence the position and the form of the genoa. These are the:
- genoa halyard
- mast rake
- genoa lead across (in & out)
- genoa barber up and down,
- genoa sheet tension
- tension of the runners
- main sheet
Try to adjust as few as possible, since it is time consuming and the possibility of mistakes increases more than the benefits of the adjustments. Therefore, we no longer adjust the length of the forestay (mast rake), as it stays always fixed at 1215 mm.
3.5.1 The optimal form of the genoa at upwind
There are several ways to determine the right tuning of the genoa, e.g. the depth and twist of the genoa. The twist is the vertical changing of the opening of the sail at the leech. A headsail without any twist would only leave a little slot open between itself and the mainsail. If the upper part of the sail is too tight, the genoa will collapse at the lower part of the luff. The lower windward telltales will rise first.
A headsail with too much twist will open up a lot in the upper part and collapse in the upper part of the luff first. The upper windward telltales will rise first, then only the lower ones. A good reference point for the right twist is the controlling view at the leech in relation to the spreader tips.
3.5.2 Genoa Tuning
3.5.2.1 General
Trimming the genoa sheet the leech and the genoa’s foot shall be trimmed as below:
| Distance Spreader tip to leech | Tuning of Genoa foot (depending also from wave condition) |
|
|---|---|---|
| LW | 60 – 80 mm | foot may just touch the upper shrouds maximum 30 mm distance to upper shrouds |
| MW I | 30 – 50 mm | Distance to upper shrouds 50 – 150 mm |
| MW II | Distance to upper shrouds 200 – 250 mm | |
| HW | 80 – 120 mm | Distance to upper shrouds 300 – 500 mm |
Eight provisions are available for tuning of the genoa:
- Adjustment of the halyard
- Position of fore stay on deck
- Length of fore stay (Mast rake)
- Position of sheet block (in/out)
- Barber haul
- Tension of main sheet
Try always to limit the use of the tuning provisions to a minimum. It saves time and reduces the opportunity for incorrect tuning which is worse than the effect envisaged.
Optimized shape of the genoa on upwind course
Several provisions will lead to a correct trim of the genoa e.g. camber and twist. Twist comprises the change of the sail’s angle to the wind in vertical direction. A sail without twist would lead to a narrow slot between its leech and the corresponding main sail only. In case the upper segment is over trimmed the genoa will break first in the lower area of its luff. The windward telltales will rise first.
A genoa with too much twist is too much open and will luff first in the upper area, later also in the lower area. The upper telltales will rise first in the upper area, later in the lower one. The best way to judge the twist is a look to the genoa’s leech.
3.5.2.2 Genoa Sheet
As already discussed in the section about the genoa shape upwind, the following is about the tension of the genoa sheet. This is the main means of adjustment and also the only one that can be tuned quickly, if the right tuning has been found beforehand for the other means of adjustments. When wind and waves are changing, for tuning the genoa we only use the sheet, barberhaul and halyard with almost no exception.
There are four kinds of genoa sheet systems:
- The genoa sheet is directly above the winch, which can be found on older dragons. At MW and HW you have to go to the leeward side to trim the genoa as you need to operate the winch on the leeward side.
- The winch lead in connection with a lever fine tune beneath the deck (lever under deck). The lever allows fine tuning of the genoa sheet from the windward side of about 200 mm. This system may be added on old boats at considerable cost. It makes the fine tuning of the genoa in MW and HW much easier.
- The possibility of winding the winch on the leeward side from the windward side. A ratio of 1:2 under the deck connected with the winding of the winch makes pulling the genoa from the windward possible. A man on the windward edge pulls directly at the sheet. The other one repeats it at the winch ratio cord, which can be pulled from the windward and changes the leeward winding of the winch. The systems 1 through 3 are used on older boats only and are no longer technical standard.
- Winchless system, the genoa sheet is directly diverted through the deck, from which it is led onto a block, which leads it back again, to a cleat. This block with the cleat is fixed onto a car, which can be tuned with a 500 mm fine tuning provision. The sheet is pulled without a winch up to a marked position at the sheet and the fine tuning of the genoa is done via fine tuning. This system is very difficult to build in afterwards because the winches have to be dismantled.
3.5.2.3 Position of the Forestay
You should definitely concentrate on the position of the forestay. The maximum distance between the opening of the forestay on the deck on the rolling mechanism and the front edge of the mast at zero is exactly 1860 mm (see also drawing on para 3.4.3).
Try to reach the maximum dimension of 1860 mm. Also, tune the attachment point of the forestay as much as possible in front. This means pull the mast astern at zero. This point relates to the front edge of the 70 mm long measurement mark at the opening of the deck of the forestay, provided that the measuring marks have been applied correctly.
3.5.2.4 Tuning the Genoa Halyard
Tuning the genoa halyard controls the tension of the genoa luff. It is one of the “auxiliary engines” of the boat and should therefore always be accessible onboard and should easily be adjustable, even under heavy load, which can be reached upwind in HW.
Next to a good ratio for the genoa halyard (we recommend 1:8), it is essential to use materials like Vectran or Kevlar lines at the adjustment of the genoa halyard for the ratio of the adjustment.
No matter which wind conditions you want to tune the genoa luff in,
- tune the mast via the runners,
- tune the main sail,
- finally pull the genoa sheet until the foot is touching the uppers
- tune the genoa halyard as follows:
Make sure the genoa halyard is always pulled just tightly enough that almost all “crow’s feet” have vanished at the luff, no more. “Crow’s feet” are the folds which appear at an angle of 90 degrees from the luff towards astern and reach into the sail. - finally tune the genoa barber hauler.
At all changing wind and wave conditions and using Fritz genoas, the tension of the genoa halyard should always be adjusted. Let your crew experiment with the tension of the halyard and don’t forget that too slack a genoa halyard is better than a too tight one.
One thing you should never forget: the tension of the genoa halyard is the “auxiliary engine” of your Dragon! It is very sensitive and will react to anything.
A good Dragon crew changes and checks the genoa and the tuning of the genoa as often as possible and takes all aspects into consideration.
The criteria for the tension of the genoa halyard are:
| LW from 0 – 1 Bft |
|
| MW (I) and MW (II) from 1.5 – 4 Bft |
|
| In HW more than 4 Bft |
|
Marks on the halyard line help you find a good tuning again. Always keep an eye on the genoa halyard and make sure that it’s not pulled too tight!
What happens most often: Many sailors pull the mast forward on downwind in LW and MW using the “genoa quick up”, but tend to forget in the heat of the moment to release it again for the next upwind:
Then action is like a movie: the crew pulls with all his/her strength at the coarse adjustment of the runners in order to pull the mast back into upwind position and, realizing it requires much power, takes the fine adjustment of the runners as a support.
This is the end of the genoa: the luff is pulled too tight and the genoa has to be thrown away or recycled as a fashionable sailor’s jacket at Fritz Sails! Your wallet is certainly going to cry.
3.5.2.5 Genoa Lead Position up and down
Next to the genoa halyard and the genoa sheet, the genoa barber hauler up and down is another very important tuning device. It should be easily accessible and adjustable from both, the cockpit and the windward edge.
There are different systems on the market just now.
- The most commonly known system is one in which the barber hauler runs through a cheek block, which is mounted onto the genoa car with the traveller. You can find this system on all Börresen, Glas and on older Petticrows.
- On new Petticrows, the genoa traveller and barber hauler are run together, which means there is no car, but two barber haulers. This very simple and cheap system works excellently. The inner barber hauler should be adjustable from the windward side and in the cockpit.
The outer barber hauler needs to be adjustable from windward, because you only use it in wind conditions of more than 4 Bft, and then you’re sitting on the windward edge anyway.
The right lengthwise position for the genoa car or the barber haulers is about station #8 of your Dragon (better 20–40 mm) better in front of station #8. It makes sense on Petticrow Dragons where both feed throughs are situated 20 – 30 mm in front of station #8.
Tuning the genoa barber proceed as follows:
- First tune the genoa sheet according to trim objective (LW, MW, HW)
- Then do the fine tuning of the genoa halyard.
- Tune the genoa sheet, according to trim objective
- LW foot touches just the US
- MW about 150 – 300 mm at the Upper shrouds
- HW about 350 – 500 mm measured from foot upwards
If you have finished with this tuning, pull the barber hauler as long as the genoa leech follows the following criteria (distance from the opening of the spreader to the genoa leech):
| LW | Flat water and choppy water | about 60 – 80 mm off the spreader |
| MW | Flat water no waves | about 30 – 40 mm off the spreader |
| MW | choppy water | about 40 – 50 mm off the spreader |
| HW | Normal waves | about 60 – 100 mm off the spreader |
| HW | Heavy chop | about 80 – 120 mm off the spreader |
Please note that at more than 5 Bft backwind can occur often in the main sail, which does not even disappear when sailing with the genoa barber hauler out and pretty opened!! This back wind is caused by a full trimmed main sail.
Countermeasures:
- push forward through mast (ram)
- increase tension on the runners
- increase tension on the main sheet
- pull the main traveler more into the middle.
3.5.2.6 Genoa Lead position (in and out)
We tried out the following numbers. All measurements are taken from the outer edge of the board to the lead block of the genoa barber. When taking the measurements, think about the fact that the genoa lead is moving outward when under pressure, because the block of the barber is not on the deck, but is, depending on the type and the make of the genoa, between 80 – 150 mm above the deck.
- From 0–2 Bft, this measurement is at 360 mm off the outer edge of the board inward.
- From 3 – 4 Bft, it is 340–300 mm.
- At more than 5 Bft, we recommend 270 out to 200 mm, especially in choppy water.
Basically the genoa barber will be set centered maximum at all wind conditions and wave conditions. Most Dragons use a “two-wire-system” with an inner lead and one outer lead. Sailing to windward always the inner lead will be used while the outer one is used when on a reach. During races these courses are rarely sailed or are very short, therefore a number of sailors decided to remove the outer lead completely.
During recent years the sailors decided to sheet the genoa at 5 Bft up to 500 mm to the upper shroud while the leech is opened to a distance up to 120 mm from the spreader tip.
3.5.2.7 Influence of Runners and rake on the genoa
The runners control the tension of the forestay (sagging) and the bending of the mast. It is the “tuning institution” on your Dragon.
Pulling the runners is
- bending the mast
- preventing the forestay from slackening
- flattens the genoa
- opens the main’s leech and globally flattens the main
The main sheet pulls to a minor extent the rig towards stern except at LW.
If you like to get your crew early onto the windward edge you may power up the main at MW 2 Bft approx. and flat water when the
- ram is at zero
- runners tightened medium
- tight jumpers
At strong winds and flat water or long waves you should apply high tension on the upper runners to minimize slacking the fore stay. This allows easy steering and leads to proper pointing.
3.6 The Runners
The runners are changed almost as frequently as the main and genoa sheet. When pointing high, the runners are responsible for the fine-tuning of the sails and on a tight reach they secure the mast.
Don’t forget: The right tension in the runners is the engine of the boat, especially in high wind.
3.6.1 System below Deck
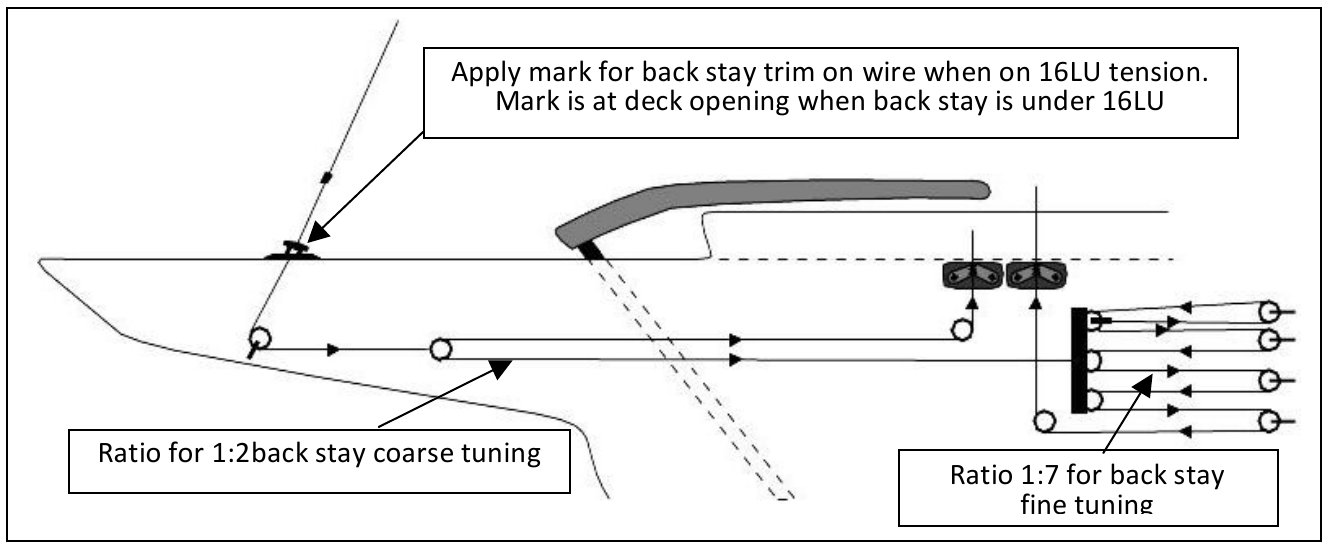
The tackle/cascade system under the deck is used on all regatta Dragons. The advantage is the coarse adjustment, which makes the rig fall forward downwind after a jibe and enables the fast tuning backwards upwind in front of the leeward mark.
There are some variations: a coarse adjustment with a ratio of 2:1, following a fine adjustment with a ratio of 6:1, better 7:1, which should be adjustable by the helmsman and the crew from a hanging position. We especially recommend these total ratios of at least 12:1, better 14:1, because light crews have problems adjusting the necessary runners with smaller ratios (e.g. 1:5 or 1:6), which were built earlier into Petticrows and most other Dragons.
In particular older Dragons are delivered with a ratio 1:1 for the coarse adjustment combined with a 1:5 or 1:6 ratio for fine tuning. On all later Dragons a 1:14 ratio is installed. A 1:1 ratio allows very fast to tighten the coarse adjustment since you have to pull about 50% less line compared to the 1:2 ratio system. The big disadvantage is the amount of strength you need to pull in a 1:6 ratio system the fine adjustment upwind. This is mostly increased by a higher friction and due to badly fixed blocks.
We noticed that the work load capability of the runner blocks are far too low in most boats for the forces that occur on them. You can even hear the runners and blocks aching and screeching when you pull. That is an indication that the blocks are being overloaded and are not running smoothly anymore.
We therefore strongly recommend to change the 1:1 coarse adjustment system on older Dragons to a 1:2 coarse system. The work may be completed after two hours. No further adaptations are required because the fine adjustment system is already 1:6 or 1:7. This results already in a ratio of 1:12 or 1:14 respectively.
For this work you need
- a wire cutter,
- two Nicro press sleeves,
- a Nicro press tool.
3.6.2 Tuning the Runners
3.6.2.1 Runners Upwind
When sailing upwind, the runners influence the bending of the mast and the sagging of the forestay. The ram influences the bending of the mast fore and aft in the lower part up to the attachment point of the forestay.
The runners influence together with the ram the bending of the mast and the sagging of the forestay.
We measured the tension on the runners with the “LOOS GAUGE PT 2-M”. The figures are shown on the table below.
Procedure
- The boat should be always tuned with a mast rake of 1215 mm
- Put the ram at zero
- Set the coarse adjustment of the runners at upwind mark
- Pull hard at the fine adjustment of one runner until the tension the “LOOS GAUGE” shows 16 LU at a height of 1450 mm above deck. (To get this tension you need a ratio of at least 1:12)
- Having 16 LU on the runner apply a tape on the runner wire just above the deck
- Ease the runner completely
- Repeat step 3 through 5 with the other runner
The closer you pull the mark against the deck the more tension on the runner is applied. If the mark is just at the deck the maximum tension on the runner of 16 LU is reached. This corresponds to a load of 4200 Newtons (420 Kp).
The following numbers may be used as a basis for the tuning of the runners when sailing upwind.
The measurements are the distance between the tape mark and the opening on the deck.
| Wind speed | Distance between tape mark and deck/swivel | |
|---|---|---|
| 0 – 1 Bft | 220 – 200 | Choppy conditions (i.e. Medemblik), which have extremely hard, high and short waves. Here, you’ll sail the tape mark at an average of 20–30 mm higher above the opening in all wind conditions as in the numbers shown above!! |
| 1 – 2 Bft | 160 – 130 | |
| 2 – 3 Bft | 130 – 90 | |
| 3 – 4 Bft | 90 – 60 | |
| 4 – 5 Bft | 60 – 30 | |
| 5 – 6 Bft | 40 – 10 | |
| 6 Bft and more | 0 mm (mark is on deck) |
3.6.2.2 Runners on the Reach
When reaching, ease the runners with the fine adjustment so that the mast can get straight and there is less tension on the runners until the tape mark is
- 300 mm above the deck (LW)
- 280–200 mm above the deck (MW)
- 180–100 mm above the deck (HW)
Basic Rules:
- The stronger the wind and the more pointed the course is, the less you should release the tension of the runners.
- The more the wind blows from astern and/or the weaker the wind, the more the mast top has to move forward, i.e. open runners up to downwind position on the coarse.
Don’t forget to push the ram forward in these courses, before easing the runners in order to give the mast a certain bend forward and to prevent, in this case in HW, the mast from bending backward (= negative). There would be a big chance of loss of the mast.
3.6.2.3 Runners Downwind
Going downwind, adjust the runners with the tape mark to about 350 – 500 mm and push the ram forward into maximum position (50 mm in the deck)! Above the deck hole the mast is allowed to bend slightly over its entire length towards bow.
On the run you have the runner fine loose and the coarse opened. Make a mark on your coarse, as this is a reference for all your down winds in HW.
On the run we ease the runner with the mark about 450 – 500 mm above deck until the mast stands, pushed by the ram, as far forward as possible.
In really strong winds, make sure that the masthead is not too much in front as the mast may break.
When sailing downwind at stronger wind your crew (e.g. during training) shall check if the mast is bending towards bow. At HW the mast shall be straight and no bend shall be above the spreader towards bow. After you have found the dedicated adjustment make a mark on the coarse adjustment.
I often noticed in clinics and regattas that the mast is not tuned far enough forward in LW and MW. Make sure that the mast can be pushed forward the permitted 50 mm with the ram. Every millimeter counts because the straighter or the more bent forward the mast is downwind, the faster you’ll be.
When putting a mark on the coarse adjustment of the runners at the maximum downwind mast position, make sure the fine adjustment of the runners is loose. The mark is 680 mm above deck.
Take the opportunity to make a knot or put a ball on the backstay line, so that it can’t get looser than the maximum downwind mast position, as all jibes are sailed both runners on loose!!
3.7 Tuning the Spinnaker
3.7.1 The Spinnaker Halyard
Hoist the spinnaker halyard totally to the top, and put a mark at the spinnaker halyard at the cleat. When hoisting the spinnaker be sure it is hoisted totally on top since at HW the related halyard can be lowered easier than hoisted when the spinnaker is in place.
The basic rule is: On the reach, the halyard should be eased about 200 mm in order to keep the spinnaker head clear of the jump stays. Downwind, the halyard can be eased 250 mm, but beware of little wind and dead waves. In that case the spinnaker must be totally on top in order to keep it relatively still.
3.7.2 The Topping Lift
Set the height of the spinnaker pole with the topping lift so that both clews of the spinnaker are at the same height. With the spinnaker sheet very loose, you can recognize the correct height of the spinnaker pole at which the windward leech collapses.
Going downwind, when you can’t see the clew on the leeward side, you can recognize the correct height of the spinnaker pole when the middle seam of the spinnaker is parallel to the mast, which means it’s vertical and both clews are at the same height.
On tight reaches and on the reach, you should set the spinnaker pole knock, which is at the spinnaker sheet about 1200 mm above the deck, as soon as there’s enough wind pressure in the sail.
In very LW, the Fritz spinnakers love it when you keep the spinnaker pole very low, about 850 – 1000 mm horizontal above the deck. The spinnaker fills much earlier. The moment the spinnaker fills, you can raise the boom again.
In MW, set the spinnaker pole knock at about 1300–1400 mm. On tight reaches and on the reach, the spinnaker boom knock should be about 1300–1500 mm above the deck, always measured at the front edge of the spinnaker pole. Downwind always 1000 mm. Let the spinnaker fly.
In HW, the best position of the spinnaker pole knock is
- Downwind at 1000–1200 mm.
- On the reach, about 1500–1700 mm above the deck. In this case, the windward clew is higher than the leeward one.
3.7.3 The Spinnaker Pole Downhaul
Attach the downhaul so strongly, that the rising of the spinnaker pole can be prevented. Especially during the setting of the spinnaker, set the spinnaker pole downhaul tight, so that the pole can’t swing backward onto the shrouds or, even worse, fold up and ruin the maneuver.
While jibing at more than 3 Bft, the downhaul must be eased a bit in order to make it easier for the crew on the foredeck to shift the spinnaker boom to the new windward side.
3.7.4 The Spinnaker Barber Hauler
The windward barber hauler for the windward sheet must always, on reaches, be pulled tight. The leeward barber hauler is always to be sailed loose on reaches. The leeward clew will be prevented from rising because the spinnaker sheet on the leeward side is running under the main boom. We call this “under boom sheeting”.
As a rule, you should always, in all kinds of winds, sail with the leeward sheet under the main boom. If you have any problems holding the boat in HW, you can loosen the boom vang, which has to be reset at the basic tuning position as soon as the gust or overpower is over.
Downwind, the leeward barber hauler shall be loose in LW and MW up to 5 Bft. In more than 5 Bft, both barbers always stay tight. Downwind both spinnaker barber haulers shall be eased about 400 mm, while above 5 Bft both barber haulers remain tight.
3.7.5 The Guy
Make sure that you keep the guy on the reach always tight enough that the spinnaker pole is at least 50–100 mm off the forestay.
Big (at least 50 mm long), easy-to-see marks made by a felt tip pen (Edding 750) on the windward spinnaker sheet are optimal for finding the perfect guy-tuning for the tight reach, or reach while setting the spinnaker.
Procedure for marking the spinnaker sheets:
- Put a ball at the end of the spinnaker sheet, and tie a knot behind it, letting it disappear into the ball. At a strength of 5–6 mm of the spinnaker sheet at the thinner end, the ball fits.
- Put the spinnaker at the sheet so that you can always tie the same knot and the mark at the sheet will always be the same
- Connection at the spinnaker sheet grommet
- Form a loop a short distance in front of the ball and push it through the thimble of the spinnaker (14 mm diameter) from the inner side of the spinnaker to the outside. You’ll recognize the inner side of the spinnaker (on Fritz spinnakers) by the colours of the leeches. Blue is the foot, green the starboard leech, and red is the port leech.
- Put the end with the ball through this loop and tie it.
This connection holds tight and can be untied even after high load. The advantage of this kind of fixing is that you can mark the spinnaker sheets and you’ll always have the same adjustment on the marks when resetting the spinnaker
Attaching the spinnaker sheet to the clew thimble with a loop and the ball end. - Now, while sailing on a tight reach on 3 – 4 Bft, mark the spinnaker sheets both sides, with the spinnaker pole in the top position. Mark either at the point in which the spinnaker sheet goes through the barber hauler or where it is fixed in the cleat on the rim of the cockpit. We recommend that you use an Edding pen Type 750 because it is waterproof and stays on the sheet for a while. We recommend a white spinnaker sheet.
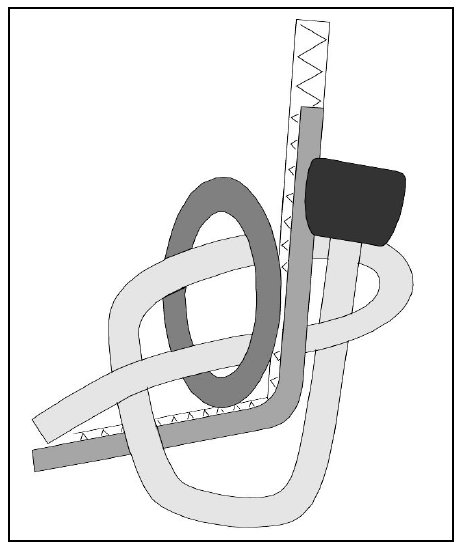
- Try to keep the spinnaker pole from touching the forestay and pushing it forcefully toward the leeward side because it can damage the genoa at the luff or even break the spinnaker pole. Use the marks on the sheet to avoid this.
- Be sure to have the guy as tight as the spinnaker pole is off from the fore stay by 50 – 100 mm.
- Marks on the spinnaker sheet are a great help to find the adjustment again during hoisting the spinnaker or after gybing.
- On the reach, the boom should be set to about 90° to the true wind, which means about 20° tighter than to the apparent wind, indicated by the windex or the telltales.
- On Downwind above 4 Bft bring the spinnaker pole as far as possible astern until you reach the upper shrouds when you want to sail really deep. The tuning objective is to use the maximum surface (= projected sail area) of the spinnaker.
3.7.6 The Spinnaker Sheet
- Keep playing with the leeward spinnaker sheet in all conditions. The luff of the spinnaker should always give way about 100–300 mm when playing with the sheet, which means that the spinnaker should “waggle its ear” which it is being balanced by a slight pulling. This constant play at the sheet guarantees that the leeward stream of air running and the spinnaker is sailed on the aerodynamic lift.
- If the spinnaker stalls on the reach or on a tight reach while playing, pull it very tight quickly until the spinnaker is full again. Ease it again quickly, so that it won’t be over-tuned for too long and slow you down.
3.8 Tuning the Rudder
Generally on a dragon, any movement of the rudder slows down the boat, because it puts pressure on the water current. A small amount of weather helm of about 3–4 degrees is an advantage and the tuning target, because it creates an aerodynamic lift at the rudder and on the other hand the boat points better.
Weather helm is created by too much heeling, due to wrong sail trim. The weather helm is caused by wind forces acting on an offset from the boat’s centerline as a result of the boat’s heeling. The offset in conjunction with the wind forces create a torque about the boat’s center which drives the boat to windward.
If you wish to avoid too much weather helm, sail your Dragon upright/flat in all wind conditions (except very light wind). If you can’t compensate heeling any more by hiking of your crew you will have to depower the sails. With a light crew of course you have to “depower” much earlier than with a heavy one.
Too harsh rudder movement slows down the boat, especially when tacking, jibing and doing little course corrections. Therefore, be extremely careful while setting the rudder and avoid excessively harsh movements except e.g. in critical situations.
4 Professional Rigging and Tuning of a Dragon
- After checking the mast thoroughly when it is lying down (see page 5), rig it. Make sure that the mast sock, if existing on your boat, isn’t hurt when you put the mast in the deck hole.
- When the mast is rigged
- fix the ram first,
- then the forestay at 1215 mm,
- connect the runners, slight tension
- connect the shrouds after taking the tripod away (sheer legs)
- put the ram into zero position (fully back) so that the front edge of the mast comes in line with the rear edge of both sideways marks on the mast
-
- Put a thin string, shock cord or a batten across the deck at station #4 and draw a mark at the center line of the boat. Station #4 can be found by marks at the side of the connection between the hull and the deck of the Dragon, about 830 mm in front of the mast marks (these are 50 mm long), next to the opening of the deck.
- Measure the distance to the rear edge of the measuring marks (50 mm long). This distance should measure 820 – 840 mm. 830 – 840 mm would be optimal (see drawing on para 3.4.3 step 4).
If these small measurement plates are attached less than 830 mm from station #4, you must move both of them back to 830 – 840 mm.
Attention: In order to meet the measurement requirements, the front edge of the 70 mm long plate next to the forestay has to be attached no farther than 1860 mm in front of the rear edge of the sideways 50 mm plates of the mast. The forestay may not be in front of the front edge of this plate (see drawing on para. 3.4.3 step 4) at this point in which it would run through the deck. For this measurement, the imagined prolongation of the wire of the forestay is relevant, not the forestay gear in which the terminal of the forestay is fixed.
- When the mast and the forestay marks are in the right position, the upper shrouds shall run through the deck about 790–800 mm behind station #4.
Measure as follows- Take the direct connection between station #4, which is at the side of the connection of the hull and the deck, up to the middle of the upper shroud.
- Should a distance of 790 mm be impossible because the holes for the shrouds are drilled at a distance of 800 or 780 mm, then change the position of the upper shrouds related to the mast position of 30–40 mm in front of the front edge of the mast when it is set at zero (e.g. when the front edge of the mast is set at zero at 830 – 840 mm, set the upper shrouds at 800 mm).
Explanation: If the upper shrouds are set on the front side of the mast, the tension of the upper shrouds going upwind is increased when the runners are pulled tighter, e.g. if the wind increases – or if the wind drops, the runners are eased and the tension on the upper shrouds is released. If you let the mast drop forward going downwind, the upper shrouds get even looser. That is exactly our goal in tuning the boat.
The lower shrouds should be 30 mm behind the upper shrouds, which is 810 – 830 mm behind station #4. This difference of 30 mm between the upper and the lower shrouds is given on newer Dragons, as the distance between the shroud holes is always 30 mm.
- Check the length of the forestay (mast rake).
- Pull the upper shrouds on both sides equally tight, up to 18 LU.
- The lower shrouds are only pulled a little bit
- Now, pull the runners until you reach 20 LU at the forestay.
- Then, measure the mast rake under this tension exactly, which should be 1215 mm, taken from the top of the deck up to the mark, as described on para. 3.4.2
It is worth doing this work extremely carefully, because the length of the forestay is never changed again! Keep the hole in which the forestay is hooked in mind, write it down and mark it. If you work hard once, you won’t have to do it again.
- Leave the runners set as shown above and check the position of the mast in the opening of the deck by putting a ruler or a batten in front of the mast when the ram is at zero (fully pulled astern).
If there is a spinnaker pole track on the front of the mast, you must deduct the depth of the track because the front side of the mast is the relevant measuring point and not the track. As for all Petticrows, this track has a depth of 7 mm, which you must deduct when measuring the front edge of the mast.
This tuning should be done once and should normally, if it is done properly, not be altered again. You should fix the turn buckle, which can be tuned between ram lever and mast, tape it, so that it won’t get loose, as if set once, you won’t change it any more.
Note: Forestay and the turn buckle at the ram are generally not altered again. Consequently, you can exclude two variables, which are the basis for sailing successfully.
- Finding the right mast butt position
- Set the tension on one runner to 16 LU (which is the maximum tension). Now you can verify if the runner system is able to take this tension (see para. 3.6.2.1).
- When you have reached this tension, look at the mast from the side and check the fore bend of the mast.
- If the mast butt is too far in front, the middle of the mast may bend backwards (negative). The optimal forward bending of the mast with one runner pulled tight is between 30 – 40 mm, measured or estimated with the main halyard, stretched from the top to the groove of the mast at the height of the goose neck.
Please take the time to measure the bending of the mast correctly and carefully.
If the bending is more than 40 mm, you have to move the mast butt forward.
- loosen the shrouds
- move the bolt, which limits the mast step forward. Attention: moving 10 mm forward is a lot
- Set the upper shrouds again to 18 LU
- Have the lower shrouds again pulled only a little bit
- Set one runner to 16 LU
- Set the ram to zero position
- Check again the forward bend of the mast looking from the side. Finding the right position of the mast step can take some time, but if you have tuned it correctly once, you will never have any trouble tuning it again.
For Petticrows GRP Dragons, we found the following mast butt position: The bolt which is fixed in the middle of the mast step and at the mast foot should be in the 9th hole counted from the front. This is our experience, please always double check!
To be sure, we also measured the distance
- from the bulkhead to the front edge of the mast at the mast step is 195 mm
- from the bulkhead to the middle of the mast is 245 mm.
If you have tuned your Dragon according to our procedure you may reach an optimum boat speed which can be seen when looking to the race results of the recent years.
-
- In tuning the shrouds, both runners remain loose at first.
- The jumpers remain open during this procedure, unless you have fixed jumpers
- One person looks up into the sail track from astern and a second person tunes the upper shrouds under the deck until you reach 18–20 LU on the LOOS PT 2M Gauge and the mast is straight.
- Tune the lowers so that a light tension is applied
- Pull a steel measuring tape up the main halyard and let it click into the halyard lock. This is needed to check the mast top is in the middle of the boat, which means the distance between mast top and the hull-deck connection where the upper shrouds are connected is identical on both sides.
- Check by measurement the distance between mast top and the hull-deck connection where the upper shrouds are connected on both sides. This distance must be identical.
- Repeat tuning the uppers until
- this distance is identical on both sides,
- the tension of 18–20 LU on the uppers is reached
- the mast is still straight
- Now loosen the lowers 2 – 3 half turns. It appears the lowers are very loose, but this is intended
If the distance between mast top and the hull-deck connection is different there are several reasons:
- You have taken the wrong measurement, so check if the main halyard has properly clicked in or has just been caught at the Curry clamp. Perhaps you haven’t used enough strength to pull it down. Pull it down hard and only use a steel measuring tape!
- The jumpers are not eased or not tuned smoothly. This only applies to fixed jumpers.
- The lower shrouds are not tuned equally or are too tight.
- The mast is not set straight coming out of the deck. There are two reasons.
- the opening of the deck is not centered to the hull or the blocks situated at the side of the mast in the deck opening don’t have the same thickness.
- the mast track is not centered in the middle of the boat
- The mast has a permanent bend, which you should have seen when you checked the mast before rigging the boat.
- Tune the lowers tight step by step until 5 LU are reached, while the uppers remain at 18 LU. One person shall permanently look along the track towards the mast top to check the mast remains straight.
Most Dragons have markings at the shroud terminals above the deck. Count these markings on the upper and the lower shrouds above the deck and write them on a piece of cellar tape which you should then put under the deck.
Example:
Starboard: US 20 LU – 5 markings LS 10 LU – 6 markings Port: US 20 LU – 5.1 markings LS 10 LU – 5.8 markings
Please note: The length of the shrouds are rarely absolutely identical. Therefore, we quite often have different numbers for the markings. The advantage of this system is that the basic tuning of the shrouds is already set every time you rig the boat.
- Fine tuning of the shrouds and repeating measurements with the same parameters.
Basically our trim considers:- the upper shrouds stand in front of the mast
- the tension of the runners changes the tension of the shrouds.
Before each measurement of the shrouds’ tension we tune the mast as follows
- ram at zero, pushed fully astern
- both runners are tightened simultaneously on both sides (!), until the tape mark, which indicates the tension of the runners, is 80 mm above the opening of the deck.
- Now you can measure the tension of the upper and lower shrouds.
According to our experience we know that for Petticrows masts, a change of a half turn more or less applied on each side increases or decreases the tension by about 1 LU.
Example: you have measured a tension of 20 LU on the upper shrouds and you would like to change to 25 LU, you will have to apply five half turns more on each side.
The lower shroud’s tension changes with half the number of half turns. That means if you like to change from 10 LU to 15 LU, you need to add another 2.5 half turns.
These figures are for rough reference only. You need to measure them very carefully yourself. All numbers you measure should be recorded in the regatta logbook, since nobody can possibly remember so many different numbers.
Tuning the shrouds is very important on the Dragon, because too tight shrouds are disadvantageous in light winds and wave. In doubt you should sail the shrouds a bit eased than too hard. You can find the numbers in the tuning guide.
Usually you only need to know which tension is applied on your shrouds at the moment you leave the dock, as a change in tension is easy if you know how to change it.
- Clear and correct markings are necessary on all control lines to find and reproduce a fast tuning. We recommend the marker “EDDING 750”, because it is really waterproof.
Coarse tuning of the Runners
Upwind,
- open the fine adjustment and measure 250 mm from the opening of the deck up to the maximum mark at 16 LU.
- at this point make a mark on the coarse adjustment. This is, according to our knowledge, a good middle wind tuning for upwind. When tacking you need to operate the fine tuning only. On our boat for upwind we have three marks: LW, MW, and HW. The marks for LW and HW you need to find out yourself.
Downwind
- open the fine adjustment and measure 680 – 700 mm from the opening of the deck up to the maximum mark at 16 LU. At this point make a mark on the coarse adjustment. This is the mark for LW. The marks for LW and HW you need to find out yourself.
At the end you have four marks on each side, which need different colors to distinguish them.
Remember: Every time you change something e.g. the length of the forestay, all markings will change, too. Therefore, always sail it at 1215 mm! You should also mark all other control lines and tunings. It is definitely worth taking your time and working conscientiously.
5 Use of Sails
Finding the right type of sail for different races is a problem for many regatta sailors. The liberal measurement rules for the Dragon allow measuring up to 8 sails for competitions. FRITZ SAILS makes your choice easier!
If one has made the right choice during the measurement procedure, which is not so hard when 8 sails are available (main, genoas, spinnakers), it may however become difficult to select for an individual race the appropriate sails (one main, two genoas, and two spinnakers) which are allowed on board by the rules.
We would like to help you choose the right type of sail with a short list.
Here, I will also remind you of the regatta logbook, which keeps track of specific races’ wave and wind conditions. It will make your choice much easier.
Generally, one set of sails will be sufficient:
- Main A-2 and the genoa C-3 suitable for all wind conditions and flat water
- Genoa C-3L as completion for light wind
- Genoa C-3H for harder conditions
- Spinnaker 9XL+ is always the right choice
This set of sails will cover the specifics of all sailing areas in question.
| Type of sail | Name | Wind | Sailing area |
|---|---|---|---|
| Genoa | C-3L | 0 – 3 Bft | All areas for LW (special design) |
| Genoa | C-3 | 0 – 6 Bft | All areas without exception (Allround) |
| Genoa | C-3F | 0 – 6 Bft | Inland areas or long waves on sea |
| Genoa | C-3H | 4 – 8 Bft | All areas HW (Allround) |
| Spinnaker | 9XL+ | 0 – 8 Bft | All areas without exception |
5.1 Sail Maintenance
With a little caution, the life of your sails can be considerably prolonged. The sails nowadays are made of tempered Dacron cloth. This is a heavy resinous cloth, which prevents the threads of the sail from moving and consequently diminishes stretching and prolongs the sail’s life.
Continued folding and storing of the sail will eventually cause the finish to break down, which will ultimately change the form of the sail. You should always roll the main and genoa. You can’t avoid the sail from fluttering before the start or during the race, but a little caution on the shore before and after the race will save the sail from wearing out too early.
If you have obtained a new set of sails, try to sail it first in conditions of 3 – 5 Bft on a pretty tight reach. In these conditions, the pressure on the sail in the seam between the luff and the leech is more even than at the same wind sailing upwind. When sailing upwind, only the aft portions of the sail are being used and the seams only stretch there while the forward area remains mostly unloaded. The result is that the profile and the deepest camber of the sail move aft.
Note: When sailing at 3 – 5 Bft on a tight reach, have a tight main boom vang for about 10 – 20 min. Do a few jibes and tune the genoa sheet correctly, have the outer barber pulled tight. Your sails will be grateful with a better stand and a longer life.
5.2 Setting Sails
We absolutely recommend that you roll your main sail and thread the outhaul carefully into the groove of the boom. When threading the battens in windy conditions, make sure that they are tightly clapped into the bar pocket with the Velcro fastening.
Please note: In windy conditions, before hoisting the main sail you should take all battens out of their pockets and thread them in again and close the Velcro fastening tightly.
We usually deliver two top battens for each main sail. The more flexible batten is used from 0 – 2 Bft, the harder one for conditions from 2 – 6 Bft. Above 6 Bft both types of battens can be threaded in at the same time to flatten and open the sail’s top area.
We also recommend that you close the shackle of the main and the genoa halyards very carefully. Perhaps you should tape it to avoid an unwanted opening of the sail while sailing.
5.3 Folding and Storage of the Sails
Please roll your sail from the beginning for transport and storage. The battens may stay in their pockets when they are transported in a rolled form, but please roll the sail parallel to the battens so that they won’t be bent within the sail. You can also store them rolled up in the boat. When you take down the main, let it slide down carefully on one side of the main boom. Fold it at the top batten and start to roll it parallel to the battens.
Make sure to always have some tension on the genoa halyard when taking down the genoa. This will keep it from breaking when you open the zipper and being dragged out of its car if the genoa falls into the water when being taken down. When taking down the genoa, keep it from bouncing against the mast and shrouds. This is pure poison for the sail.
Every time you hold your sails, either to roll or fold them, check them for scars around the spreader, the pockets for the battens, the foot at the height of the runners, and the luff rope. If you detect tears at the foot or at the height of the spreader on the main or the genoa, you should cover the ends of the spreader with a spreader cover or some white tape and at the same time look out for open cotter pins etc.
Small tears in the main sail and the genoa can be temporarily repaired with a sail repair tape or with tesa texture tape. It is very difficult to repair the spinnaker temporarily because of its silicone coated surface. Normally you should consult a sail maker.
If you want to store the spinnaker for a long period of time, it should not be pushed into a bag, but folded together. Lay the spinnaker flat onto the ground and fold it once by laying the clews onto one another. Now, fold up the spinnaker like a white sail by using 600 mm broad tracks.
Generally one stores all sails dry and without any salt. Clean your sails after salt water regattas carefully with fresh water and let them dry out completely! Be especially careful of humidity in the strengthened parts or the sheet horns.
If you have more questions about tuning or the boat itself, please don’t hesitate to write or phone us.
Good Luck and have fun with your new FRITZ Dragon sails!
Your Fritz Dragon Sailing Team
6 Where do I get something for my Dragon?
6.1 FRITZ-SEGEL GmbH
- The best and fastest Dragon sails;
- tuning instructions,
- LOOS Gauges PT2M
FRITZ Segel GmbH; Ernsdorferstraße 66
83209 Prien am Chiemsee
Tel: +49 (0)8051-4327; Mo–Fr 9–12 and 13–17 hours
Fax: +49 (0)8051-62202
E-mail: info@fritz-segel.de
6.2 Yacht Racing Services & Consulting, Vincent Hoesch
Petticrows masts and booms; main and genoa halyards; runners, LIROS ropes, rubbers and tapered sheets; LOOS PT-2M gauges, TICKTACK digital compass, Brackets for compass on mast, HARKEN blocks and metal fittings, HARBECK Trailer, MUSTO sail gear, Covers for Dragons, Edding 750 Marker, MUSTO Clothes
Yacht Racing Services & Consulting,
Vincent Hoesch; Fellerer 11,
D-83229 Aschau
Tel: +49 (0)8051-966665
Fax: +49 (0)8051-3223
Mobile: +49 (0)175-2427006, also SMS
E-mail: vincent2@t-online.de
Internet: www.vincent-hoesch.de
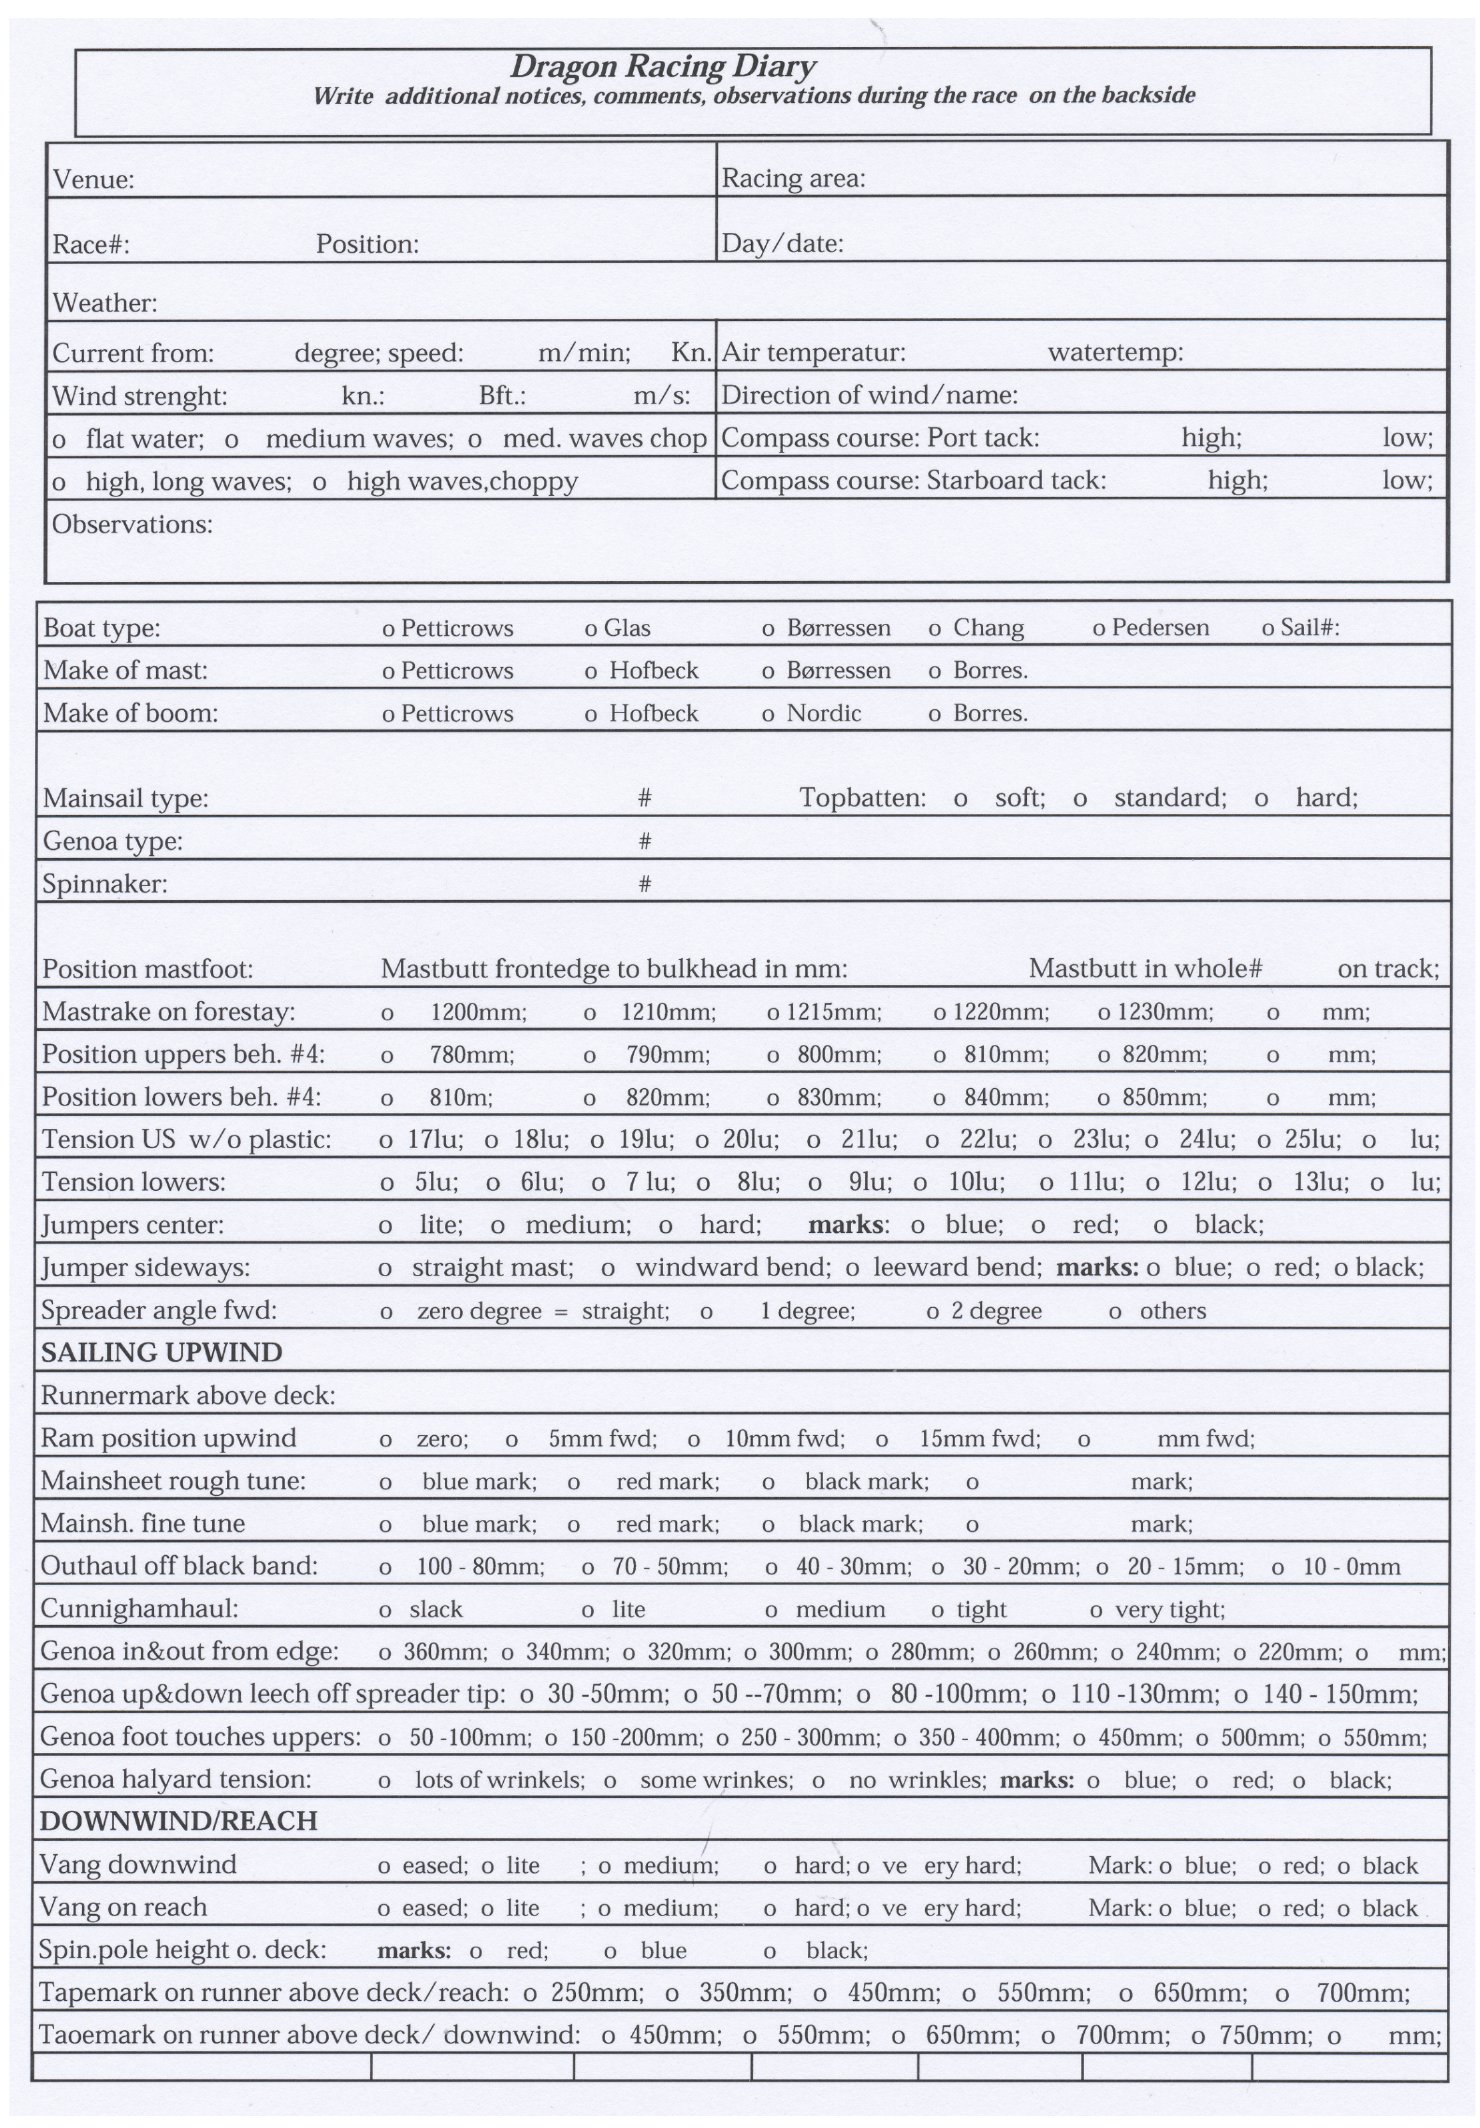
Originally published in the Fritz Segel – The Dragon Tuning Manual (2012, v04). © Fritz Segel, Vincent Hoesch and Werner Fritz. Reproduced with permission.
← Back to the Technical Library